These Website Standard Terms and Conditions written on this webpage shall manage your use of this website. These Terms will be applied fully and affect your use of this Website. By using this website, you agreed to accept all terms and conditions written in here. You must not use this Website if you disagree with any of these Website Standard Terms and Conditions.
2. Intellectual Property Rights
Other than the content you own, under these Terms, HomeStudioExpert and/or its licensors own all the intellectual property rights and materials contained in this Website. You are granted a limited license only for purposes of viewing the material contained on this Website.
3. Restrictions
You are specifically restricted from all of the following publishing any Website material in any other media; selling, sublicensing, and/or otherwise commercializing any Website material; publicly performing and/or showing any Website material; using this Website in any way that is or may be damaging to this Website; using this Website in any way that impacts user access to this Website; using this Website contrary to applicable laws and regulations, or in any way may cause harm to the Website, or any person or business entity; engaging in any data mining, data harvesting, data extracting, or any other similar activity concerning this Website (homestudioexpert.com); using this Website to engage in any advertising or marketing.
Certain areas of this Website are restricted from being access by you and Home Studio Expert may further restrict access by you to any areas of this Website, at any time, in absolute discretion. Any user ID and password you may have for this Website are confidential, and you must maintain confidentiality, as well.
4. Your Content
In these Website Standard Terms and Conditions, “Your Content” shall mean any audio, video, text, images, or other material you choose to display on this Website. By displaying Your Content, you grant HomeStudioExpert.com a non-exclusive, worldwide, irrevocable, sub-licensable license to use, reproduce, adapt, publish, translate, and distribute it in any or all media. Your Content must be your own and must not be invading any third-party’s rights. HomeStudioExpert.com reserves the right to remove any of Your Content from this Website at any time without notice.
5. No warranties
This Website is provided “as is,” with all faults, and Home Studio Expert express no representations or warranties of any kind related to this Website or the materials contained on this Website. Also, nothing contained on this Website shall be interpreted as advising you.
6. Limitation of liability
In no event shall HomeStudioExpert.com, nor any of its officers, directors, and employees shall be held liable for anything arising out of or in any way connected with your use of this Website whether such liability is under contract. Home Studio Expert, including its officers, directors, and employees, shall not be held liable for any indirect, consequential, or special liability arising out of or in any way related to your use of this Website.
7. Indemnification
You hereby indemnify to the fullest extent HomeStudioExpert.com from and against any and/or all liabilities, costs, demands, causes of action, damages, and expenses arising in any way related to your breach of any of the provisions of these Terms.
8. Severability
If any provision of these Terms is invalid under any applicable law, such provisions shall be deleted without affecting the remaining provisions herein.
9. Variation of Terms
HomeStudioExpert.com is permitted to revise these Terms at any time as it sees fit, and by using this Website, you are expected to regularly review these Terms.
10. Assignment
The HomeStudioExpert.com is allowed to assign, transfer, and subcontract its rights and/or obligations under these Terms without any notification. However, you are not allowed to assign, transfer, or subcontract any of your rights and/or obligations under these Terms.
11. Entire Agreement
These Terms constitute the entire agreement between HomeStudioExpert.com and you concerning your use of this Website and supersede all prior agreements and understandings.
12. Governing Law & Jurisdiction
These Terms will be governed by and interpreted by the laws of the United Kingdom of Great Britain, and you submit to the non-exclusive jurisdiction of the state and federal courts located in United Kingdom of Great Britain for the resolution of any disputes.
Planning to build a home recording studio? You must be going through all the guides, tips, or techniques that you can find online or offline. (I did the same thing)
After researching other sources and some of my experience, I have come up with this post and will try to be as complete as possible.
By the end of the post, you should know how to build it and even have the idea of building a professional music studio.
Before we dive into the details, you must know that building a studio room is a big and easy task at the same time.
If you don’t know the basics, then it will be a complete mess, and you will have to do it all over again.
Those who are starting tend to leave out some important things while setting up. It may be due to ignorance, lack of money, negligence, or others.
But down the road, they regret it. I am a VICTIM of the same … I had to rebuild my room cause I messed it up completely.
So, I will be covering all the things needed in building a recording room – flooring, soundproofing, acoustic treatment, room selection, gears needed, positioning, other additional gears, etc.
Approaching it in a planned manner will give you the best results. Every process has its own steps that you should follow, and the same applies here too.
An Example
For instance, let’s say you are building a house. Think about the steps needed in building the house.
First of all, you have to think about the space or where you will build it. After that, you have come up with the number of rooms and the design of the house.
The second thing you need to decide is the material you will use to build it. Lastly, you are going to decorate the room and come up with the base idea for it.
The important thing is that the amount of money you want to put in will also affect the house you are building.
We need to look at other factors – like the number of family members, space for the family members, amount of space for the kitchen, living room, etc.
And this will be different for all the families out there – as they have their own preference.
You need to understand some things before you start building the house and do it according to your needs.
Like this, we will make it simple and easy to build the recording room while making you understand the basic things needed.
The first thing we need is a room where your gears will be set up. Keep in mind that the room’s nature also plays an important role when you are setting up a recording studio.
You will probably have two or three rooms that you can select from, and you should go for the room with the maximum space among them.
More space, the better it is. It is because more space will help in the process of acoustic treatment later.
Having more space inside the room will provide the needed space for natural reflections to occur, making the recordings sound natural.
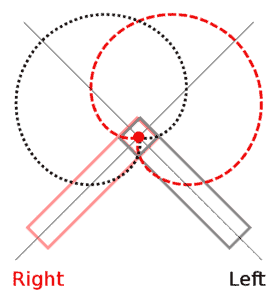
It will also help when you are making the stereo image identical inside the room, therefore helping in the positioning of the gears.
Identical stereo image – It is the phenomenon when the reflections inside the room are symmetric in nature.
On the other hand, almost all of the rooms inside a house are not meant to sound great while recording. (as they are not built for it)
So, an ideal type of room or a room close to this will be hard to find .. and we need to manage with what we have.
You must avoid building a home studioin a small and square room.
This will completely ruin everything with the annoying reverberations between the walls and other factors that will be hard for you to manage later.
After you have chosen the room, the next big thing is the type of floor you want to install.
There are different types of flooring for a studio that you can go with. It can be hardwood flooring, laminate flooring, cork flooring, concrete flooring, etc.
Every one of them has its own merits and demerits. And you should choose the one that will suit you the best for your situation.
1.Hardwood flooring –
It is the type of flooring that you will see in most of the pro studios. And they are also mainly used for recording rooms.
They sound more natural as compared to others and give that original kind of ambiance to the reflections.
If you have hardwood floors already installed inside the room, you don’t need to replace them. You can go to the next step of the process.
Hardwood floors are durable and will last for a long time. This will help in keeping up with the traffic inside the studio.
But it is expensive, and you need an experienced person to install it properly. If you have the budget then, I suggest you go with this.
2.Laminate Flooring –
This type of flooring is prevalent nowadays due to its various advantages as compared to others.
It can be used almost anywhere, and you can expect something more than the price you are paying for.
The best part about it is the ease of installation. It is quick and simple to install over any flooring. And you don’t need to be a flooring expert.
You need to install a sub-floor before it. After that, you can put it over the sub-floor without the use of glues or nails.
But, laminate floors won’t give natural reflections to the level of the hardwood floors.
On the other hand, you will be getting a good deal for the price range. I mean.. it is durable, easy to maintain, cheap, water-resistant, and you can choose from a wide range of styles and colors.
You can opt for this if you are on a tide budget but, don’t expect it to give you the best results.
3.Cork Flooring –
This is also one of the floors that are becoming popular nowadays. It is now competing with natural materials.
It has good sound deadening property, and so I have seen studios using this type of flooring. Due to this property, they are mainly used in control rooms.
You can also use this as a decoupling material between two layers (as a sub-floor) due to the sound deadening quality.
The sound waves’ reflections will be quite lower as it mainly absorbs them and gives off a warm nature.
Note that it is not that durable as compared to others and expensive too. It should be in the same price range as hardwood floors.
So be sure to choose something that will be good for you and your budget.
If you want to know the different prices of various flooring, an article explains it.
3. How to Sound Proof your Recording Studio?
It is the process of blocking the unwanted sounds from the outside environment and also the sound from inside the studio from leaving.
This is the first thing that you should do before you start acoustic treatment. Many people leave this behind or do only this while building a recording studio.
You shouldn’t make the same mistake. For a recording studio, both soundproofing and acoustic treatment are needed.
Both of them are equally necessary too. And it would help if you didn’t mix up soundproofing with acoustic treatment.
I have mentioned in other posts that these two are completely different processes and complement one another.
The following are the simple steps involved in soundproofing your room –
Step 1
Filling up all the holes and cracks that are at the walls of the room or studio. Search every nook and corner of your room so that you don’t miss any of it.
This might look like something that you could neglect, but I can assure you that it can have the potential of ruining your recording easily.
Moreover, it is not a difficult thing to do. You can use something like a NoiseProofing sealant to fill up the gaps, and the cracks easily
Step 2
The second step is to soundproof the door of your room or studio. Soundproofing the door is an easy thing to do as compared to other steps.
You can just put an Adhesive Weatherstrip below the door to close up the gap between the door and the floor.
This will do the job if you have a good solid core door. But if you don’t have a solid core door, you won’t be able to block the sound completely.
Hard and thick materials are naturally good for blocking sound waves.
If you have money to invest in a solid core door then, go for it. It will be a great investment for your studio.
Another way that you could do this without spending much is to use a Sound Proofing Blanket instead of a solid core door
Singer Safety Double Faced Quilted Fiberglass Panel, 4′ Width x 8′ Height x 2″ Thick
Panels have bound hems, double nickel plated brass grommets 12″ O.C. along top and 18″ O.C. along…
Double faced material in nominal 2″ thickness, for use as an absorber, or combination…
Measures 4′ width by 8′ height by 2″ thickness
Last update on 2025-07-19 / Affiliate links / Images from Amazon Product Advertising API
It would help if you hung it in front of the door when you are recording or doing something related inside the studio.
That is what I did when I first started, and it is very effective too. Affordable and easy to maintain are one of the main points to it.
Don’t forget to buy a blanket that will cover the whole door, so make sure you get a blanket with the right dimensions.
Step 3
Next up are the windows; you can completely remove the windows if removing them won’t be a problem for you.
If you need light or don’t want to remove the windows, you need to soundproof them.
What you could do is remove the normal glasses and replace them with soundproof fiber glasses. Make sure you don’t leave any gaps on the edges when installing it.
Another alternative is to use the same technique mentioned above, hanging a soundproof blanket over it. (but the sunlight will be blocked)
Step 4
Small but something you need to take care of is the ventilators. It would help if you kept the ventilators as well as soundproof them too.
You need air to breathe, and therefore you can’t remove them all from your room. So, we need to keep it open and deaden the sound waves coming through or leaving it simultaneously.
For this, a technique called the Sound Maze technique is commonly used to deaden sound waves.
Sound Maze Technique
It is the technique in which the sound waves are made to pass through a series of zigzag patterns where acoustic foams are placed along the way.
Doing so will greatly reduce the sound waves passing through it and let the air pass through it simultaneously.
This is the way to go rather than going for an expensive route while building a soundproof ventilator.
Step 5
Building a second layer of the wall over the initial wall. This step may or may not be required according to your needs, but it will be required most of the time.
Let’s say you haven’t properly blocked the sound from the outside environment after you have gone through the above steps.
Double layer wall (Rough Diagram, No details)
It might be due to the room’s thin, dry walls or structural problem where all the walls vibrate when children run or walk in the other room, when the garage door opens, etc.
All you have to do build a new layer of the wall over the original by adding a sub-layer between them.
This will provide the decoupling effect between the two layers of the wall. You can use acoustic foams or anything that has high sound deadening properties as the sub-layer.
Step 6
This is also an optional step. But a good alternative to the above step if you have space that you can give up.
It is to build a new room within your original room and is commonly known as isolation.
You have to put up a separate room inside the original one and do all your recording and other related things.
It will greatly dampen the sound waves coming from the outside world and achieve perfect isolation from other unwanted vibrations.
The soundproofing process ends here, and let’s move on to the next important step.
You can have a look at the process in more detail here – Sound Proofing.
4. How to do Acoustic treatment?
The next big part and one of the important steps that you need to take it seriously. Yes, you are going to need some cash for it but treating your room is a must (in my opinion)
And I can assure you that you will be able to produce a good quality recording.
There are certain steps that you need to follow while treating your room. This treatment will help you tune the space to the way you like.
You will control the number of reflections and absorption of the sound waves inside the studio until the desired level is achieved.
Step 1
The first thing we need to do is absorb unwanted sound waves inside the room, which can ruin the records.
Various frequencies of sound waves from lower to higher ones are present inside the room whenever we produce sounds.
The frequencies as stated above may be constructive or destructive depending on the nature of the room.
But most of the time, it will be on the destructive side. The rooms we live in are generally destructive in nature as they aren’t meant for recording.
So you need to install two types of sound absorbers – Bass Traps and Acoustic Panels.
Why Two?? Cause they are a bit different from each other and have different absorbing properties.
Low-frequency sound waves are hard to notice and control using only the acoustic panels. Therefore, we need a special type of absorber.
This is where bass traps come into action. It can absorb bass frequency and other low frequencies.
Bass traps are placed at the corners of the room.. and the reason is that bass and other low frequencies tend to build up the most at the corners where all the walls meet.
Step 2
After this, you need to add the acoustic panels, which would mainly absorb the mid and high range frequency sound waves.
You can put your acoustic panels on the opposite sides of the parallel walls. Parallel walls will produce repeated reflections of the sound waves.
Resulting in adding up or cancellation of the sound waves. This may also produce standing waves.
It will interfere with the initial sound waves, which will eventually ruin the recording or mixing process.
And remember not to overdo it. If you install many acoustic panels to deaden the sound waves, it may lead to a completely dead environment.
We don’t want that to happen. So, check by doing some test records as you go through the process until the desired level is reached.
Step 3
As I have told you, we don’t want a completely dead environment. Reflections are necessary to have a lively environment.
And we need to make the reflection to be natural as possible. We need diffusers; they will help reflect the desired sound waves uniformly inside the room.
Uniform and symmetric reflections around the room is a must to create a lively space inside the room.
On the other hand, you may or may not need diffusers inside your home recording studio. It depends on the level of liveliness you want in your room.
Your room might be perfect without it too. But adding a diffuser helps in making the recordings sound more natural.
By the way, you can mimic diffusers with a bookshelf (filling up a compartment for every two), but it won’t be as effective as the dedicated one.
Different acoustic treatments exist for different situations.
For example, Acoustic treatment for a live room and that of a control room are different.
But we are building a home-based one, and therefore most of us are going to do all the things such as recording, mixing, monitoring, etc., in the same room.
For this, we need to make the room fit for the main process like recording and mixing. What we can do is build a space which has two regions in it.
One Live region and one Dead region. The live region for recording stuffs and the other mainly for mixing and monitoring.
(LEDE) Rough Figure
Here is a rough diagram on that.. and it is commonly known as LIVE END DEAD END (LEDE)
Here are the most basic recording equipment needed for a studio
Audio interface
It is a device whose main function is to convert analog signals to digital signals, which can be fed to a laptop or pc or other consoles where you can mix, monitor, edit, etc.
I know most of you are going to use a pc or a laptop. And the interface will act as the sound card for your computer.
The built-in soundcards of your pc won’t be able to give a professional level of audio quality. With the help of an audio interface, you will connect professional instruments, microphones, etc.
It will greatly improve the quality of your record or music. An audio interface provides various input and output signals, where you can connect two or more microphones at a time and feed the output signals to other various sources.
If you are trying to record a whole band, you might need an interface with more input for various instruments.
So make sure you buy an interface that had enough inputs and outputs to your needs.
Two great audio interfaces are the Focusrite Scarlett 2i2 and the Behringer U PHORIA UMC404HD: check out which one is better here!
Digital Audio Workstation (DAW)
It is the software that you install on your computer where you can cut, edit, monitor, and mix the tracks to make it better.
It is the music recording software to put it in simple terms.
This software will help you mix multiple tracks, alter the tracks, and even add effects to them, giving you the final product.
Several different types of DAW are out there from different companies. Just choose the one you would like and master how to use it, don’t go jumping from one to another.
To name some few of them are – Ableton Live, Logic Pro X, Pro Tools, FL Studio, etc. Some of the Audio Interfaces come with them as a package.
So, you don’t need to worry about buying it separately. There are also free and paid versions, and you should have a look at them if you want the paid versions.
Some of the best free music studio software are Audacity, Garageband, Traverso, Jokosher, etc.
Laptop or PC
Yes, it would help if you had a laptop or a pc where you will do the editing, mixing, cutting, monitoring, etc., of the concerning tracks.
You really don’t need to get a new one if you already have it. A high-end pc or laptop is not compulsory in this case.
A medium spec one will do just fine if you are starting. You can upgrade it later when you have the money for it.
Make sure you check the DAW requirements too. Each one of them has its own requirements, and make sure you have the minimum specs as stated.
Working on Mac or Windows doesn’t really matter here. Both are good for music production; go with the one you are more familiar with.
The advantage of Windows is that they are cheaper compared to the Mac. After some research, here is a rough idea of some of the basic system requirements –
4GB Ram 2.2 GHz or more with Dual cores 512 Mb Graphics Memory 1TB HDD (more space.. the better it is for storage ) i3 processor
Having more RAM will also be better if you are going to use other plugins. Remember you have room for upgrades if you choose to build a pc while having a laptop doesn’t.
Don’t think too much about this.. get something that will work well. After all, making good music or audio doesn’t depend on the system. It will be on you mostly.
Microphones
You need good quality microphones if you want to make your music or audio sound good. The best part is that you can get decent microphones for about 150$.
The types of microphones you are going to use are called XLR microphones and not USB microphones. Cause XLR microphones are the ones that work with Audio Interfaces.
And dedicated microphones exist for recording different audios. For example, a large-diaphragm condenser microphone is more suitable for recording vocals.
Like this – dynamic mics for the kick drums or condenser mics to record the whole thing, it can go on like this for electric guitars and acoustic guitars.
If you are on a tide budget, make sure you have the least needed two or three microphones to record the vocals and other instruments.
And I suggest you upgrade it later when you can.
There are also unidirectional, bidirectional, omnidirectional microphone types. You should go with unidirectional microphones for recording vocals as they are best suited and take up more sound from a particular direction.
A pair of headsets is a must for your studio. You are going to need this almost in every step of recording.
So invest in a decent pair of headsets that you can afford. You are going to need it in recording, mixing, monitoring, editing, etc.
Hearing through Headphones while recording will let you monitor if there is anything wrong with the live recording
It can be nasty unwanted background noise, disturbances in the circuits causing humming effects that would eventually ruin the process or anything that can mess it up.
Small background noises are hard to detect with our naked ears. But it will be very prominent when you hear the records, and headphones are the ones that will help you pick up these sounds.
Some of the different headphones are Open Back headphones, Closed Back Headphones, and Semi – Open back Headphones.
Some people prefer Open back while the others prefer Closed-Back headphones. But the important thing is that you should know how good music sounds like with the headphones you are using.
There is a bit of a learning curve to it, but you will get to it once you have some experience.
Monitors
You are going to need a pair of monitors to monitor your music or records effectively. When headphones help you monitor small things, they won’t give you the natural feel of the music.
What I mean is that headphones pump music right into your ears, and they don’t represent real-life scenarios.
In real-life situations, you need to consider things such as the needed reflections, mixing up of channels, time gap, etc., before reaching to our ears.
Every room also has a particular ambiance to it. And so we need to make it sound good in the real-life scenarios, too, and not only on headphones.
Mistaking low-quality music for a good one is easy if you use only a pair of headphones for your recordings.
More info on – Headphones and Monitors, Why you need both? And what are the steps you need to take if you are going to work with only one of them?
Pop filters
It is the piece of filter device that you put in front of the microphones. It acts as a shield to filter the popping sounds created by the breaking of fast-moving air.
It also protects the microphones from saliva, which helps prolong the life of the microphones. (Saliva contains compounds that corrode the surface over time).
6. Additional gears
Reflection Filters
This will help you block unwanted sounds from other directions or sources while recording your vocals.
Microphones are susceptible, and they tend to pick up even the smallest disturbance in the background. And reflection filters will help you reduce it by blocking these types of sound waves.
DI Boxes
A DI Box (Direct Injection) device converts high impedance unbalanced signals to low impedance and balanced signals.
It is a handy device if you are using electric guitars, bass guitars, keyboards, etc., which produce instrument-level signals (unbalanced).
These type of instrumental level signals needs to be converted to low or mic-level signals which can be directly fed to an input of mixing consoles.
It also reduces the humming and buzzing effects in electronic equipment, which are caused due to interference of the electromagnetic fields.
Use a UPS as a backup power source for your recording studio. It helps you prevent losing your unsaved changes to the records or mixes under process during blackouts.
You never know when something like that will happen, and you should be prepared for it. It is effortless to lose all your work in one swoop.
And you have start all over again. So, have a back-up plan for that.
Power Attenuator
This device will help you cut off the excess signals from the amp before going into a speaker.
If you are using an electric guitar then, this will help you reach maximum tonal potential while keeping the volume low at the same time.
I wrote a review on a Power Attenuator, and you can have a look at it.
1.Be realistic and try to manage with what you can get for your studio. Don’t go around buying all the expensive gears and setups.
You can always upgrade it later. And Keep about 50% of your budget for acoustic treatment as it will help your music sound better.
2.You can use everyday common materials that are soft and thick to deaden the sound waves inside your studio. Some examples are cushions, mattresses, etc.
Soft and porous materials are natural sound absorbers. You can add some of these if you don’t have a big budget in the treating process (I don’t recommend using all of this instead of acoustic panels)
3.Always position your monitors in an equilateral triangle with your seat. By doing this, you get the maximum efficiency from your monitors.
Seat Positioning
Here is a rough diagram on that.
3.Choose a pc or laptop that doesn’t make that much noise. They tend to make some background noise while recording.
And I suggest installing some acoustic panels at the wall just at the back of your pc or laptop.
4.Your room plays an important part in recording music, and I suggest you choose a room that gives you more space.
The feeling inside it will be shown on your vocals and recording. (as we know, music comes with emotions). And the environment you are in can influence you negatively or positively.
Therefore, try to be in a positive ecosystem.
5.Before you start recording, do some warm-up sessions by yourself. Calm yourself and try to be comfortable inside your studio.
Recording songs or music on a smartphone is the most convenient way today; almost everyone will do it with their smartphone if they want to record something.
We all have a Smartphone right in our hands all the time, plus it’s easier and quicker to use it to record something.
The recorded track won’t be a good quality track. You can expect something that would come out of a phone recorder.
Yes, we can make things better, and we are going to talk about it. Still, it won’t be that of high quality. And remember, the built-in microphones are not meant for recording quality tracks.
The microphones on your Smartphone won’t be able to take in high bass, frequencies, etc., which are common things at a concert. We need to do something about that too.
But recording good quality concert audio on an iOS device (such as iPhone or iPad) or Android device is possible.
There are several ways that you can record concert audio using your Smartphone. It can be on any device.
You can record clear and good quality sound by making minor changes to how you do it.
Best Ways to Record Concert Audio
1. Using only your Smartphone
In this method, you are going to use only your Smartphone to record the concert audio. If you want to record high-quality vocals only then, it’s is pretty straightforward with a voice recorder app.
Using SmartPhone only
But in this case, it’s a bit tricky and difficult to get the best out of it.
The quality of the track will depend mainly on the device you are using to record with. If you have a high-end device, then it’s definitely going to be better than low-end ones.
Having a high-end device will give you a bit of an advantage here. I highly suggest a smart phone such as Google Pixel 5 or Samsung S21. With these Android devices, you can easily download an audio recording app from the Google Play store. As I have mentioned earlier, the built-in microphones are not meant for recording high basses and frequencies.
Google Pixel 5 – 5G Android Phone – Water Resistant – Unlocked Smartphone with Night Sight and Ultrawide Lens – Just Black
New, unlocked Android phone gives you the flexibility to change carriers and choose your own data…
5G capable [2] smartphone gives you an extra boost of speed so you can download a movie in seconds,…
Charge your cell phone wirelessly [6] or use it to wirelessly charge other Qi-certified devices [7]
Last update on 2023-05-30 / Affiliate links / Images from Amazon Product Advertising API
Samsung Galaxy S21 5G | Factory Unlocked Android Cell Phone | US Version 5G Smartphone | Pro-Grade Camera, 8K Video, 64MP High Res | 128GB, Phantom Violet (SM-G991UZVAXAA)
Pro Grade Camera: Zoom in close, take photos and videos like a pro, and capture incredible…
Sharp 8K Video: Capture your life’s best moments in head-turning, super-smooth 8K video that gives…
Multiple Ways to Record: Create share-ready videos and GIFs on the spot with multi-cam recording and…
Last update on 2023-05-30 / Affiliate links / Images from Amazon Product Advertising API
Therefore, when you record the concert audio,all those loud sounds will get distorted. Now, to prevent this from happening, all you have to do is cover up the microphone(s) on your phone.
You can use your fingers to cover it, or tape will do the job fine. I think using a ticker-tape will reduce the distortion better than thin tape. Figure out the best thickness yourself.
As the sounds from the concert will be high enough to be recorded by the mic even if it is covered with the tape while reducing the distortions. If you leave this out, then it will be a complete mess.
Another thing that will annoy your records will be the noise of the crowd. It will completely ruin your recording if it overpowers the sound of the concert.
You are using only your Smartphone to record, and the only thing you can do is go early and take the best suitable place for recording.
When I say the best possible place, I mean where you can record or hear the concert sound louder than the crowd’s noise.
Note: Before you do anything, check if you can record the concert or not. There are times where recording concerts are banned. Don’t worry; you can just hit the record button and keep it in your pocket.
2. Using an external Microphone
You can add an external microphone to your setup and use it. Recording the concert audio this way will give you the best quality track possible.
It can be a Bluetooth Microphone or a USB microphone that you can connect to your Smartphone. They are readily available at online stores, plus they are not expensive at all. You may need to purchase an additional USB adapter with a USB microphone to connect your microphone to your mobile phone.
Anker USB C Adapter (2 Pack), USB C to USB Adapter High-Speed Data Transfer, USB-C to USB 3.0 Female Adapter for MacBook Pro 2020, iPad Pro 2020, Samsung Notebook 9, Dell XPS and More Type C Devices
Anker Advantage: Join the 55 million+ powered by our leading technology.
Space for Two: The ultra-slim form factor ensures there’s space to plug two adaptors side by side…
Strong and Stylish: Finished in Space Gray and constructed from premium scratch-resistant aluminum,…
Last update on 2023-05-30 / Affiliate links / Images from Amazon Product Advertising API
Apple Lightning to USB Camera Adapter
With the Lightning to USB Camera Adapter, it’s easy to download photos and videos from your digital…
After you connect the Lightning to USB Camera Adapter, your iPad or iPhone automatically opens the…
When you sync iPad or iPhone to your PC or Mac, the photos and videos on your iPad or iPhone are…
Last update on 2023-05-30 / Affiliate links / Images from Amazon Product Advertising API
SmartEra USB Female to 3.5mm Jack Male Audio Converter Adapter (Black)
High Fidelity. Anti-interference. Good Signal.
USB 2.0 female connect the Flash Disk, can read the mp3 form Flash Disk.
3.5mm male plug in the car AUX port.
Last update on 2023-05-30 / Affiliate links / Images from Amazon Product Advertising API
A condenser microphone or shotgun microphone would provide better sound quality but would potentially be impractical.
Just get one that you can connect with your Smartphone and use it. I can bet you that the recordings will be much better than the above.
But, before you buy the microphone – remember you are going to use it inside the concert. You will need a small microphone and can take in high basses, frequencies, loud sounds, etc., without distortions.
You can use something like Lavalier microphones for this as they are small, and you can hide them in your collars, pockets, or other parts.
There are unidirectional, omnidirectional microphones, and you should use a unidirectional one to record the concert audio.
As unidirectional microphones will pick up more sound from one direction and you can make it face in the concert sound direction.
This will pick up the concert sound louder than the noise from the crowd.
And for the info, there are different types of microphones for different purposes. Such as – you need different microphones for recording vocals and drums separately.
I highly suggest you look up the different types of microphones before you get one for yourself to get a better understanding of it.
3. Using Stereo Microphones
By Iainf 23:51, 21 September 2007 (UTC) [GFDL or CC-BY-SA-3.0], via Wikimedia Commons
You might want to step up the game a bit and try to record the concert in stereo. Doing this is not that hard, and you could do it in two ways.
The first is using two microphones and setting them up to record stereo sound. And the other is to record using dedicated stereo microphones that can be connected to your Smartphone.
In the first one, you have to use two microphones and set it up using the Coincident Mic Technique; this setup will help you achieve the stereo nature.
You will probably need a microphone with a cardioid pick-up pattern, as you will record loud sounds.
And for the latter, you will use a dedicated stereo microphone while recording, and it is way better than the first one.
You can find various types of stereo microphones at the market, and all you have to do is get a good one that will work with your device.
One of the most common and popular stereo devices for Apple IOS products is the iM2 Stereo Microphone from TASCAM.
It is a well-built and compact stereo microphone that you can just plugin on your device to start recording. The best part is that it is small, and the gain level can be adjusted too.
You can find other variants with slightly different prices. However, this device is not available for Android devices, and you have to opt for something like the Olympus Stereo Mic.
Sale
Olympus ME-51S Stereo Microphone
LCD display during recording
Fantastic quality stereo recording
Voice Recorders
Last update on 2023-05-30 / Affiliate links / Images from Amazon Product Advertising API
Wondering how you could do acoustic treatment for your home studio or for a dedicated one then, this post will surely give you a better understanding of it.
When I first started I was searching here and there for guides, other effective and cheap ways on how to do it.
And I know you must be doing the same thing, that’s why you are here… right?
The utter truth about it is that – It is quite easy and you can do it easily if you know the basic building blocks.
Don’t get me wrong here, I am not saying that any beginner can do an excellent job at a single try.
On the other hand, it is quite achievable for anyone if you know what goes into it and how you should do it.
Let’s look at an example
Say you are building a PC from scratch and you are a complete beginner. The first thing you need to know is – the parts needed to build a pc.
You also need to configure these parts according to your needs. Like .. you need a Better GPU if you want to play games.
A processor with more cores and high RAMs will help you render video faster, etc. After this, you have to put them all together.
Lastly, you have to install the OS for your system and you have finished building your PC
Now, you might be saying “What does building a pc have to with Acoustic Treatment?”
Well, see for instance there is the systematic way in building a pc, and like this – the treating process has its own procedure.
Summary
There are things you need to do first before you start the process of sound treatment.
You need to know what type of room or space you are dealing with. Is it for a cathedral, a home theatre, a small room or studio or a mixing room!!
It can go on like this and all you have to know is how to configure for the situation you are dealing with.
The process for treating a large cathedral will be quite different from that of a small studio room.
You must have experienced that cathedrals sound very good and empowering – cause they are made to sound like that.
I will try to explain step by step how to do it from the very basics. I will make it simple as possible and cover as much as possible.
So that you know and get an idea on how to achieve a decent treated environment that is going to suit your situation.
Moreover, you can tweak and make changes to get the desired ambiance from your room.
Coming to the topic, we are going to discuss the acoustic treatment of a home studio.
Here are the main points that we are going to discuss and you can skip to any portion if you already know it.
Why you need it
How it works
What the main steps involved in the process are
Things needed for the process
How to do it
How much it costs
DIY Acoustic treatment tips
Why is acoustic treatment important?
It is as important as having dedicated microphones to record different types of instruments.
Treating your room is an essential task that you should never leave out while building a studio or home studio.
This is the process with which you will be able to set up the studio room to sound the way you like.
Moreover, you will be able to control the ambiance of the room and set different regions such as the LIVE END DEAD END (LEDE) for specific purposes.
If you don’t take the time to treat your room properly then, I can assure you that the recordings won’t sound good
Even the monitoring and mixing process will be difficult. Every room already has its own ambiance and a natural room suitable for recording is hard to find.
We are talking about a home studio here… So the possibility of the studio is in the basement, garage, or a normal room is quite high.
Disturbances that you are going to experience –
The type of rooms for a home studio as I have mentioned above will be filled with mainly two types of sounds :
1.Sound coming from outside environment – it can be any type of disturbance from the outside world. This is also the first thing we need to prevent.
It will seriously ruin your recording and get in the way of treatment process if you happen to leave this out.
I have two small siblings and the thing with them is that they are all crazy. They will make this loud noise just to disturb me.
And you will get it if you have siblings too. You need to isolate your studio from the surrounding environment to get the best out of it.
2.Unwanted sound inside your studio – This is where the treatment is necessary and it can range from low-frequency sound waves to high-frequency sound waves.
It could be the flutter echoes due to the reflective surfaces inside your room – walls, ceilings, instruments, etc.
According to your room, it may be filled with a lot of reverberations or maybe completely dead on the other hand – which are not suitable for a studio.
You need to control this and make it more or less lively. These are the main reasons why you need to treat your room properly.
After the process has been completed, you will be able to record, monitor, and mix effectively. Plus the quality of the track will be much better than before.
Breakdown of the sound waves present inside your room :
The direct sound waves traveling directly to the recording equipment, the microphone. And this type of waves will maintain it’s characteristics
All the other sound waves traveling in other directions excluding the above will get reflected back and reach the microphone. But, these reflected waves will have different characteristics.
While the changes in the characteristics may be bad or good for your studio… Mostly bad…
Keeping it Simple and Basic while maintaining the balance in absorption, diffusion, and isolation is the key.
How it works? (Short Summary)
It works on the simple principle of removing any unwanted thing till the desired level is reached.
Let’s say you need to isolate your studio more before treating it. Then you go through the isolation process.
This is a process where you limit the movement of sound waves from outside the room to inside and the other way around too.
Next, you are going to check and try to reduce the sound waves that will ruin the recording inside the room using absorbers of the different frequency ranges.
Yes, you are going to need different material absorbers for different sound waves.
Different materials respond very differently to a wide range of sound waves and we need to know what works the best for a particular range of frequency.
We have isolated and reduced the annoying sound waves… Now, we need to tune the reflections to sound more natural.
Therefore, the last thing we need to do is make some of the reflections needed distribute equally inside the room.
Symmetric distribution of the sound waves (rather than in some particular directions) is very necessary for a natural-sounding environment.
Many people think that they can get away without doing it, but the utter truth is that “You Simply Can’t”.
If you are building a professional studio or a home-based studio, you shouldn’t avoid treating the room.
I can guarantee that you will regret it later for not going through the process – cause I have experienced it.
I made this mistake when I first started out and the quality of the track was very bad.
You might be thinking “Oo !! I don’t have the cash for that.” Well, you need to start saving up some bucks if you are serious about this.
And I Know you are….
After all, it all comes down to these things :
Who are you making the music for? Is it going to be for the public or are you going to keep to yourself…
You want professional sound quality and plan to release it to the general public.
Planning on upgrading your home studio to a professional one…
Or you just want a high-quality track.
Nevertheless, going through the process won’t be a loss to you and your studio.
We should never forget to check the response of the room along the process of creating. And remember not to overdo it.
As it will lead to a completely dead environment, and we don’t want that to happen.
Short Note: To tell you the truth, building a room with great acoustics require a lot of cash and space too. So, what we are going to do is either fake it or tune the reflections of the room to mimic an ideal room.
Steps involved in the process
Step 1 : Isolation of the studio
Many people tend to leave this out and don’t consider doing this .. but you should isolate your studio room before you do anything else.
The isolation process is commonly known as “Sound Proofing”. And as you may know, it’s the process of blocking unwanted noise coming from the outside environment.
Please don’t mix up Sound Proofing with Acoustic treatment, these two are very different things.
On the other hand, they compensate one another and the first must be done before coming to the latter.
While you are doing soundproofing, the thing you should always remember is that “Thicker and more compact the material, more is the sound blocking capacity”.
So, let’s say you have two doors, one is made from thin and light plywood, and the other – a thick solid core door.
The hard solid core door will be better at blocking unwanted sounds. The same goes for your walls too.
I think most of you will have drywall, and I suggest you add another thicker layer to that as an additional one.
You can add acoustic foam as a sub-layer between the walls to make it more effective. Don’t forget your windows and ventilators too.
Look at this article on how to do this properly. We will focus on the two main steps involved in the treatment process below
Step 2 : Sound Absorption
Now, we are going to tune the reflections inside the room according to the level we need.
It’s the process in which sound waves are absorbed and prevented from reflecting back to the microphone which will eventually ruin the recording.
For the info, not all reflections are bad. I am talking about the reflections that have the potential of damaging the record.
Let’s say we didn’t put any sound absorbers inside the room. Then, some of the frequencies of reflecting waves will get amplified or canceled out (in the case of parallel walls)
While there may be annoying flutter echoes inside the room. And on the other hand, some of the low-frequency disturbances will go unnoticed with your naked ears.
But when you hear the recording, it will become obvious and evident. We need to remove those too.
Step 3 : Diffusing the Sound waves
Yes, we need to diffuse the sound waves inside the room too as we are not going to completely absorb the sound waves.
Reflections are also a very necessary thing needed inside a studio to make it sound more natural while recording.
We don’t want a completely dead environment, and it will be a bad thing when you try to record too.
What we want is the right balance of absorption and diffusion to make sound clean and natural.
And in this process, we are going to diffuse or scatter the sound waves uniformly throughout the room.
You should make sure that the absorption part is completed and after that, you should add this according to the amount needed.
As for a small studio, you might not even need it… if the second step is enough for you then, you can stop there.
From my point of view, there should be some amount of diffusion so that there is some natural ambiance to the recording.
Well, the decision is yours to make, and make sure you check as you go through the process if what you are adding is enough or not.
The essential things needed for the treating process
1.Bass Traps
This is the thing meant for absorbing bass frequencies (plus low frequencies) and can’t be done by simple acoustic panels as low frequencies like them are hard to handle.
It’s the thing that you commonly see on the corner of the walls of a studio. The thing that looks fancy and good inside the studio is actually meant for this purpose.
It offers a wide range of absorption ranging from low to high-frequency waves including bass frequencies.
Don’t get me wrong here when I say it can absorb low and high-frequency waves too.
Yes, it can but not to the extent where you don’t require anything more like acoustic panels.
Sometimes, it may be enough but they are meant for absorbing high and low-frequency sound waves.
2.Acoustic Panels
They are main device that will absorb the high and mid frequency signals
These types of acoustic panels should be used after you have installed the bass traps as they are not good at absorbing the lowest frequencies.
They will be helpful in reducing the change in characteristics due to the parallel walls as I have mentioned above (like standing waves).
Hence, the bass traps and the acoustic panels will compensate each other as they will be placed at different positions inside the room.
3.Diffuser
For diffusing the sound waves present inside the room.
Diffusers are generally expensive as compared to others and some people say that it’s not that necessary while others say it is.
And the best know if your studio room needs this or not is to test your room.
After you have added the bass traps and acoustic panels, try recording and look if the recording sounds natural or has a room ambiance to it.
If it’s not to your liking then, you can add a diffuser and see if that solves the problem.
Building ad making a good acoustically treated room will always be a trial and error method. You have to check it as you go through the process.
Installation of the sound deadening materials
The following steps will also give you an idea of how you should do it and where you should place the acoustic foams.
Step 1 : Install the Bass Traps
Circular shaded portion
We are going to place the bass traps at a position where the bass frequencies are the highest.
They also offer a wide range of absorption and therefore it will be best to choose a place where we can effectively absorb all the most frequencies.
And the region will surely be the eight corners of your studio (if it’s a Cuboid shape). It’s the place where all the three walls (three nodes from different dimensions) meet.
I have also shown the positions on the figure with shaded circles, and this is the best place to put the bass traps.
Moving on to the next part of the process…
Step 2 : Installation of acoustic panels on corners
Shaded Corners
You should also install the acoustic panels on some of the corners (not all) of your studio.
The corners stated here are the remaining corners where the two walls meet. These positions are the second thing you should care about after the first one.
It deals in two dimensions. You can just bend the acoustic panel and install it in the corners. There will be some gap when you install it like this.
And don’t you worry about that cause it will still help in the process. If you don’t get it then, have a look at the diagram I have here.
Now, You have the idea of what I am talking about right… Let’s move on to the next part.
Step 3 : Installation of acoustic panels on the flat walls
For Parallel walls
We have finished the three dimensions and the two dimensions. Therefore, we are left with the one dimension thing.
And we are going to deal with that in this step.
You are going to install the acoustic panels on the flat walls probably install them on the parallel walls to remove the standing waves caused by them.
When you install them make sure you are installing them in a way that will eliminate the amplification or cancellation of the frequency of the concerned waves.
And be sure to install them in a zigzag manner as shown in the figure for the maximum efficiency with the least amount of panels.
So that one panel isn’t directly opposite to another panel on the other side.
You should do it for any shape of the acoustic panel you are using – it may be square ones or rectangle ones, longer ones, etc.
To the last part of the process ..
Step 4 : Installing the diffuser
When you are installing the diffuser (if you are going to) you should do it in the upper parts of the wall.
Commonly, they are placed at the back of the studio at the live end region to prevent the uncomfortably dead situation due to over dampening.
As I have told you that you can skip this part only if you don’t need it as they are a bit expensive.
Be sure to check if your room sounds dead and less lively. Only then you need to keep some reflections and scatter them using a diffuser.
Now, you know how it works and where to place the acoustic panels, bass traps, diffusers, etc.
Different types of treatment
Yes, you need different types of treatment for different situations. For instance, the treatment for a live room and a control room are different from each other.
For recording, we need a live room that will sound nice, natural, and lively. But for the mixing process, we are going to focus on the accuracy of the monitors.
Therefore we need somewhat that is less lively where you won’t be interfered with by the reflected waves.
The pro studios have separate rooms for each one of them. But, that won’t be the case for a home studio.
I don’t know if you are going to build a recording studio or a mixing studio. Probably, you are going to do both.
So, we are going to do both in the same room and we can achieve this using the LIVE END DEAD END technique.
(LEDE) Rough Figure
It’s a simple process of creating two regions inside a single room.
The process will depend on the positioning of the gears inside your studio. For example, you should keep the studio monitors to have a larger space from the wall it is facing.
It’s is to make room for reverberation that we are going to need. Further, we need to place the monitors such that the stereo image is symmetrical throughout the room.
The other thing you should keep in mind – the sitting position should be equilateral with your two monitors as shown in the figure.
Don’t forget to keep some distance between the monitors and the rear walls and also put some bass traps on the walls rear to the monitors.
You can have a look at the diagram and see a rough idea of the room acoustics. You will notice that there are two regions in the same room.
One is a live region and the other is a dead region. And that’s how you do it for a home studio.
And please note that the number of acoustic panels or diffusers you should install will depend on your room.
Figuring that out is your job. By the way, you can test this by clapping your hands inside the studio or saying something like “Hello!!” inside it.
Examine whether the room responds to the way you want. You can even check by doing test records.
Some Guidelines :
Control rooms generally go about with 50% – 60% coverage while doing the treatment process. It can go lesser and more but that’s the average I have seen.
Live rooms can go up to 50% and the lowest around 20% coverage in the process.
Remember it can vary according to your room and you shouldn’t forget to test it along the installation process.
How much does it cost?
It can be expensive if you are going to use high grade commercial materials to do it. It can easily cost you a couple of thousand dollars.
Waitt !! Don’t get carried away with that. For a home studio, you can still manage to do it properly with a low budget.
It can go around from $500 – $1500 depending on the number of materials you use and the size of your room.
There are also packages for Acoustic Treatment, where all the needed materials come in one single package.
You can just buy it according to the dimensions of your studio. If you buy it like this then, you can save some money compared to buying them separately.
Make sure you go through these steps properly and have a look at my post on building a home recording studio from scratch if you are planning on building one.
Some DIY Acoustic room treatment
1.You can use common things such as clothes, pillows, cushions, blankets, etc.
Which are soft but thick and porous in nature as sound absorbers.
Soft and Thick materials are naturally good sound absorbers and you can use everyday common materials that fit the description to absorb sound waves and reduce echoes.
While adding these materials, don’t forget to add them uniformly so that the stereo inside the room is symmetrical in nature.
2.You can use a book shelf and make it do the job of a diffuser.
It can be done by arranging the books in such a way that it will scatter the waves uniformly throughout the room.
You can mimic the shape of the diffuser by filling up one of the compartments for every two.
Disclaimer : It won’t be as good as a dedicated diffuser but it will still help.
3.Another thing that you could use is a reflection filter for your microphones.
When you are recording … and as the microphone is very sensitive they will pick up the sounds coming from other sources too.
This will definitely ruin the recording and this is where the reflection filter is useful – it will block off unwanted sounds from the surrounding.
4.Using one-directional microphones while recording vocals and other instruments.
As one-directional microphones pick-up more sounds in one direction other than the remaining ones, it will help in achieving clear records.
These are for people who don’t have a budget right now and plan to do it later. Hope these tips help you manage some of your problems.
Recording with your Smartphone is a pretty easy and simple thing to do. But make we can make things better and sound more professional.
Using a Smartphone to record is the way to go nowadays as we all have a Smartphone in our hands. However, keep in mind that smartphones are not meant to record high-quality audio.
The microphone inside a Smartphone is not meant for professional recording. It can handle only a small range of frequencies.
Yeah!! We can record high-quality audio on Android or iPhone using their high-end devices. Still, it won’t be that good compared even to a setup using only a dedicated microphone.
Moreover, we can reach or even surpass the high-end devices’ quality by making some minor changes in how we do it.
On the other hand, having a high-end device will give you a little edge here. The reason is that it supports newer versions of software, gives you more options while recording, and better hardware.
But Hey!! You can still manage with a decent Smartphone. And I know that almost every one of you reading this will have one.
There are small but significant factors that can affect your recordings, and you need to take care of these things first.
1.Surroundings– This is the first thing that you need to look into before you record anything. You can check by doing a test record if anything is annoying.
Like if there is any background noise, any humming or buzzing sound persisting on your record. You will surely miss out on small disturbances of this type very easily.
Our naked ears can’t pick up low-frequency sound waves, while the mic present at the smartphone will easily pick up the low-frequency waves.
What seemed a quiet environment might not be that quiet after you have recorded it. Today we live in a noisy environment, and so it is easier to make this mistake.
If there is anything that will ruin the recording, find it and try to fix it before the real recording starts.
Do a test record and you will know what I am talking about.
2. What are you going to record? You really need to know that the setup will be very different for different situations if you want the best recordings with your smartphone.
There are mainly two categories that you are going to record using your smartphones. The first one – recording the voice only for something like YouTube, podcast, or maybe for anything.
The second situation – recording music, a concert, a live band, or a loud environment. Now, these two situations are quite different.
The first one will usually be a quiet environment, while the latter will be noisy and loud. So, recording in these two systems will be different from each other.
Try looking from different angles for the two systems. I will be covering the best possible way to record in the two situations later.
3. Try to remove any disturbances – You should cut any disturbance that will come from your phones. Close all the apps that are running in the background.
I would keep my device on airplane mode if I were to record something good. I suggest you do the same. This will help you a lot from the annoying notifications ruining the recording.
Your Facebook notification, Whatsapp group messages, etc., will for sure disturb you while you are doing your work.
I can guarantee you that this will save you time from recording the same thing all over again.
How to record the audio?
First thing you are going to need –
Hi-Q Mp3 Recprder App for Android
You need an App for recording. Get a good recording app from the Appstore, where you can change the quality, file format, etc.
You need an App that gives you more options than you can play with while recording. There are many Recording Apps out there, and you need to choose something that you like.
There are free and paid ones, but I think you can manage very well with a free one. If you want the paid ones, then you can still get them from the Appstore and it’s only about 2$ or 3$ on average.
It won’t break your bank balance.
The app I use is Hi-Q MP3 Voice Recorder – one of the best voice recorder apps for android, and I think this app is not available for iPhone users. For iPhone users, you can use something like Multi-Track DAW.
Multi-Track Daw is like a small Digital Audio Workstation for iPhone users. You can do a lot of things with it.
By the way, don’t limit yourself with these apps. You can always opt for something you think that’s better or even premium ones. Remember premium apps will always be better than the free ones.
Here are some screenshots of my recording app –
Bit Depth Rate
As you can see I can change the bit rate here and it goes all the way up to 320 kbps from 32 kbps. I can also change the format of the file to WAV, M4A, OGG, and FLAC.
File Format
You can also increase or decrease the input gain level for your recording. This is what I am talking about when I said about having Options.
Gain Control
When choosing an app, check if they have some of these basic options, as they will help you improve the recording quality.
Recording process
It’s time to start recording, and you need to prepare for the kind of environment you will record.
Let’s say you are recording only vocals in a quiet environment and you have taken care of the three things mentioned above; then you don’t need to worry about anything.
Your Smartphone will handle it very well, producing high quality plus clear audio track.
On the other hand, let’s say you are trying to record a concert, a live band, or something with high bass, frequency, etc., then you should change the setup a bit.
The built-in microphone won’t be able to handle these types of sound waves, and you are going to need an external microphone for your Smartphone.
If you record a live concert, you probably need a microphone to handle all the bass without distortion.
It should be a unidirectional one, too, if you want to lower the voice coming from the crowd. The same goes for recording a live band.
But you can exclude the directional feature if you are in a room or somewhere there is no crowd.
There are many external microphones out there that you can use with your Smartphone and don’t cost that much. You can plug it in and start recording. Simple as that, no technical stuff needed.
We recommend the Rode VideoMic Me:
Sale
3,442 Reviews
Rode VideoMic Me Compact TRRS Cardioid Mini-Shotgun Microphone for Smartphones
Compact Trrs Cardioid Microphone Designed For Ios Devices And Smartphones; Frequency Range 100Hz -…
High-Quality Directional Microphone That Connects Directly To The Iphone Trrs Microphone/Headphone…
3.5Mm Headphone Output. Weight: 34Gm; Dimensions: 38Mmh X 21Mmw X 80Mmd
Last update on 2024-08-14 / Affiliate links / Images from Amazon Product Advertising API
Adding an external microphone for your recording will greatly improve the quality of the audio you are producing. Therefore, I suggest you get one if you want the best from your Smartphone.
Want to know more about recording songs !! Have a look at the post on how to Record a song easily.
In this article, we are going to talk about how to reduce unwanted echo inside a room. Before we come to reduce the echoes, there are some things that we need to understand.
We will go through: how an echo is produced, the reflective materials that will help produce the echoes, and how we can implement echo solutions.
How is an echo formed?
Echo is produced due to the reflection of the sound waves from any reflective material.
Surfaces that reflect sounds will include but not limited to:
Long echoes generally stem from acoustics bouncing:
From wall to wall
From floor to ceiling
Note: It is formed due to the difference in the time period between the initial waves and the reflected waves reaching our ears.
Hardwood floors will cause intensive echoes inside your room with the ceiling. It’s important to have the back of your mind that hardwood floors might not be the only thing causing the echo. There may be others aiding it.
By the way, if you already know these things, then you can jump right to the “How to” part.
Producing or presenting echo inside a room depends on other factors such as the room’s dimensions, the type of walls and floors, the type of furniture, etc.
You need to take these things into account if you are trying to reduce echo inside your room.
How to dampen these reflected sound waves?
We should know that sound waves are mainly reflected by polished surfaces present inside the room. And these sound waves should travel for a distance before reaching our ears.
This will create a difference in the time period before reaching our ears,which is important for producing an echo.
If you have a big room, the echo will be produced for sure, and it cannot be enjoyable if you are trying to record your vocals or anything.
We can reduce the echo inside the room if we prevent these things from happening. So, it would help if you were having some ideas now.
Now, hard and polished materials are very reflective in nature, and they will aid in producing echo inside your room. Some examples are the hardwood floors, wooden furniture, leather coverings, etc.
Either you remove and replace them with non – reflective ones or add other sound materials to combat the reflected waves. Upholstered furniture will be absorbant in nature for sounds.
You should know that soft and rugged materials are natural sound absorbers. If you add them inside your room, it will absorb the sound waves, including the reflected ones.
Adding them too much will lead to an arid environment, which will ruin everything. Therefore balancing it to the desired level is a must.
We will reduce some of the reflecting materials, replace them with soft materials, or add sound-deadening materials.
We might even do a mixture of them according to your desired environment.
Best Ways to Reduce Echo in a Room With Hardwood Floors
1.Using everyday Common materials –
Using common Materials
You can reduce echo in a room cheaply and don’t require any technical stuff or knowledge. First of all, the most important thing is to cover up some of the reflecting surfaces like your hardwood floor.
You can use rugs to cover some of the portions of the floor. If you want to cover the whole room, then you could do it. But I think it won’t be a necessary thing.
As some of the portions would be covered up by furniture and other things. Now, if you have a large empty room, then this won’t be enough. You have to take care of the bare walls too.
You can do two things with the walls; you either hang a thick curtain to cover the empty walls or bring in furniture like bookshelves, tables, etc.
Don’t forget to arrange the books on the shelf in a Zig-Zag manner. This will act as a diffuser and make the reflections go in different directions to make it more natural.
Canvas and other decorative materials can also be hanged on the walls as long as they are soft and have sound-absorbing property.
Remember, “SOFT and THICK” materials are the best DIY sound absorbers, and you can add anything that fits the description.
Some of them are cushions, pillows, mattresses, carpets, rugs, soft fabrics on your furniture, etc.
2.Covering or Replacing the Floor –
Cork Floor
You can cover up or replace the hardwood floors with Cork Floors and Vinyl tiles. These types of floors are good sound absorbers as compared to hardwood floors.
The reflecting capacity is deficient compared to that of hardwood floors. Cork Floors has the most sound absorbing capacity and is used in studios.
It is good with the feet too. Installing the cork floors is not a tough thing, but you need some knowledge of it. And you should probably hire a professional to do it.
The same goes for the Vinyl flooring too. And the best part is that you can choose from a wide range of textures and colors that will go with your room’s design.
Note: If you are doing this for your recording studio, you don’t need to replace it. Hardwood floors are more natural and comfortable for recording vocals and instruments. You can do Acoustic Treatment instead.
3.Using Dedicated Sound Absorbing Materials –
Square Panels – Sound Absorbers, Below AC – Diffuser
You can reduce the echo inside your room using sound-absorbing materials such as foams, diffusers, acoustic foam panels, etc. Taking this route will come closer to that of a treated room.
You have to install the acoustic foams on the opposite walls to prevent sound waves from reverberating between the walls. You can even add diffusers to one of the walls.
This will make the sound waves reflect in all directions symmetrically and make it more natural. But before you add the diffusers, check if you can manage without using only the acoustic foams or panels.
You can do this by making a noise like shouting “Hello” or clapping inside the room, and check if the echo is still there or not.
The number of foams or panels you have to use will depend on your room, and I can’t say the exact amount. You have to check it yourself as you go with the process.
Please know that reflections are necessary too inside a room to make it sound natural. Don’t dampen it more than the needed level.
The best way for room echo cancellation is to do a mixture of the three ways that I have mentioned and go until the echo is removed from the room.
With this, the noise and echo reduction in a room with hardwood floors has come to an end. Do check out my other articles on soundproofing, acoustic treatment, etc.
We all know that there are gears which are a must for a recording studio. And there are those which are not a must for a studio.
Then, there are those gears which can help you improve your home studio and enhance the capabilities of your gears.
So, I will be listing the best 15 products for your home recording studio which will surely help you a lot.
I can guarantee you that the products that I have listed will help you improve your studio as much as possible. You will also learn how they can help you in improving your studio.
Note: This is not a guide on improving the studio. It’s just a list of the products that can help you do it.
The Best 15 Products
1. Power Attenuator
Are you an owner of an electric guitar? If you are then it can be quite annoying when you play the guitar.
I think you can relate to what I am talking about. Yes, I know it sounds good for you and your ears.
But, it is very annoying to the ears of your neighbors and other family members. And you need to do something about this.
On the other hand, let’s say you have a well-soundproofed home studio – you will still need to remove the excess signals coming from your amp.
As it can be quite annoying sometimes. And I think for most of the cases you won’t have a well-soundproofed studio.
This is where the Power Attenuator comes in. It will help you cut off the excess or unneeded signals from the amps before going into a speaker.
The best part is that it will still maintain the maximum tonal potential of the signals coming from the amp while keeping the volume at a lower level.
So, it’s a win-win situation for you and your studio.
It is a critical part of the puzzle when you build a studio. Many a person leaves out this thing when they built their own thing.
Yes, you can forget about this and not include it in your setup if you use only headphones.
But it is a must if you are using a pair of monitors. A poorly treated environment while using monitors will amount to nothing good.
It’s even safe to say that the monitors won’t do its job at all.
You should use Diffusers to make the sound reflections distribute evenly inside the room. And should be kept at the live end region of your room.
Even distribution is very necessary for a good recording studio. You can build diffusers yourself by mimicking the features of a diffuser – like using a bookshelf.
But, it won’t be that effective as that of a dedicated one.
3. DI boxes (Direct Injection)
DI boxes are used mainly to convert an unbalanced signal to a balanced signal.
It can convert the high or instrumental level signal to mic-level signal which can be fed directly to a mixing console.
If you go to gigs or perform live, this piece of box can help you a lot. As it can split the instrumental level signal into two outputs.
One to an amp and the another to a mixing or recording console.
It will also remove the humming and buzzing effects created by the interference of the magnetic fields of the live wires.
Reflection filters are the piece of gear that you can put on the rear of your mic.
It is to prevent unwanted sounds reflected from the back walls or elsewhere from entering the mic. As this will mess up everything while recording.
Vocals mics nowadays are very sensitive and can pick up even the slightest change in the characteristics of the waves.
So, this is a recommended piece from my side. Yes, you can still manage without this using the unidirectional mics.
But, still you can’t prevent others coming from the other sides.
5. Virtual Instruments
You may be thinking that it’s not that of a big deal, but to be honest this is a must for your studio.
If you are multi-talented then it might be ok for you. But I think that it won’t be the case for most of us. I am not multi-talented.
I can’t play all the instruments effectively. So, this is where virtual instruments can play a very important role.
You can always get these virtual instruments for the price of a single original instrument. It will be easier for you too.
Just choose the instrument you need and get a virtual instrument of it. It is also too easy to get hands-on with one of them as there are plenty of them.
This is a must for those who use only a pair of headphones to produce a mix or record.
If you want to produce a mix that will sound great on any playback device or in any situation, then you should get one of these.
Mixing only on a pair of headphones is very easy to mistake the quality of the track. It is because in headphones the music is pumped right into our ears.
And this won’t be the case for other listeners. Some of them will listen on different devices, so you need to experience your music like that of a real-life scenario.
That’s why monitors are there. As you don’t have monitors, we have to try and mimic the situation.
This will mix the right and the left audio channels to mimic the effect produced by that of a pair of monitors.
It won’t be the full 100% effect but still it’s better to have it.
7.Bass Traps
Bass traps are added inside the studio mainly to fight the low frequencies that are present inside the room.
They are placed at the corners of the room as these are the regions where the low frequencies build-up happens.
Low frequencies are also quite difficult to pick up with our naked ears and you need to combat this type of frequencies when you are treating your studio.
The good thing is that Bass Traps are not expensive and you can always add a couple of these at the corners.
8. Snake Cables
This is a must if you have many input cables inside your studio. If you don’t have that much gear then you don’t need this.
A snake cable with 8 or 16 channels will be enough for your home studio. You will see snake cables with more than 16 channels.
This type of cable with more than 16 channels will be common at big studios, pro studios, and live concerts. You might have seen them too.
To put it simply, it is a single audio cable that is used to connect audio devices together. One of the main things you should consider for your cable management.
Well UPS will provide backup power, but what about the uneven power supply. There can be sudden spikes, surges, and decrease in the power supply.
This is a nasty thing and it could damage all your devices. You don’t want this to happen to your gears.
They will also protect your devices from other disturbances such as electro-magnetic interference and radio frequency interference.
Which will harm your audio devices and create unwanted noise at your records.
There are a number of Power Conditioners out there. You can just check the price and get an idea of the price range.
Rockn Stompn RS-4 8-Outlet 15 Amp Power Strip with Surge Protection and Conditioning for Musical Instruments
HEAVY DUTY HUBBELL RECEPTACLES
16 Foot Power Cord
Last update on 2025-04-27 / Affiliate links / Images from Amazon Product Advertising API
11. Multiple Output Monitor management system
If you are a small home recording studio, you are planning to upgrade your studio.
And one thing you should include is a Multiple Output Monitor Management System so that you can do a cross-reference check on different playback devices.
As I mentioned above on the crossfeed plug-in part, having a check on different payback devices is a must for your recording or mix.
You need to make sure it sounds good. And most of the Audio Interfaces don’t have this, but it’s an important piece for your studio.
There are various types of them for a wide range of price. I will list two of them which are commonly used :
Behringer Minimon MON800, one of the best for the price range.
Mackie Big Knob, a little bit expensive but has a better layout and user-friendly
Mackie Big Knob Studio+ Monitor Controller and Interface with 1 Year EverythingMusic Extended Warranty Free
Last update on 2025-04-27 / Affiliate links / Images from Amazon Product Advertising API
12. Isolation Pads
It is a basic pad to separate the monitors from the desk. It will help us prevent the transfer of low-frequency vibrations form the monitors to the desks.
A small, but still significant thing that you should take care of if you want accuracy in your recordings.
13. Weatherstrip
One of the most commonly and widely used soundproof material for doors. It is a soundproofing device that are kept under the doors.
The little region that is open under your door will be your enemy when you soundproof your room.
Moreover, the thing is that you can’t completely fill that portion too as you have to use the door. So, you need something that you can put there and take it off whenever you like it.
Therefore, a Weatherstrip which you can plug in and plug out whenever you like it, is a must to block that portion.
14. Soundproof Fibre Glass for windows
You read it correctly, soundproof fiberglass for your windows. If you don’t have a window(s) on your studio, then you don’t need this.
If you are someone who needs light from outside to get the feels or you might have windows as your room is not a professional one.
The simple window glasses are not meant for soundproofing. And you need to get a soundproofed one.
When you replace the glasses, let an expert do it and make sure they don’t leave behind any openings on the edges of the windows.
15. Soundproof Blanket
A soundproof blanket can be used on your doors or windows or even walls (though I don’t recommend it).
If you have a solid core door, then it’s ok as most of the sound will be naturally blocked by itself.
But if you don’t have a solid core door, then you should hang one of this on the door and make it cover the door region.
It will prevent the unwanted sound waves from entering the room and also prevent the inside sound from leaving.
It’s more of a DIY way to soundproof your doors if you don’t have a solid core door.
Get a Soundproof Blanket that can entirely cover your door and then cut it to the dimensions of your door. After that, you can just hang it in front of the door.
There are many ways of flooring a home recording studio. Some of them are easy to install, while some are not and may require a heavy investment. We will look at the different ways to achieve the ambiance we want from our flooring for recording. I will be discussing each choice of flooring and what you need to know regarding the acoustic properties. It will be easier for you to choose among them based on your situation and recording purposes, whether for a video or music studio. It will mainly depend on the amount of budget you can put into it.
So what is the best flooring for home recording studios? The best recording studio floor is hard flooring. Hardwood, tiles, or concrete are good examples. You should avoid using carpets because they wear out from high foot traffic and absorb high frequencies, which messes up with the acoustics.
In this ultimate guide, I will try and help you get clarity with the different options and tell you my thoughts on what I think are the 4 best floorings for recording.
Before we come to that part, we will discuss some important factors to consider to be a better judge when choosing to floor for recording.
Hard flooring is desirable. It is the ideal choice forrecording music, according to professionals. If the aesthetics did not matter, concrete would be ideal due to its reflective nature. On the other end of the spectrum, the carpet would be most discouraged. Soft flooring like carpet often provides poor acoustic properties.
The aesthetics of the flooring is to be considered. Concrete would be ideal but might not give you the most welcoming feel.
Price is what you pay; value is what you get. Ultimately, a choice of flooring may be the best but discussing the option may be redundant if it is beyond your budget. The size of the room will be a major factor in determining your budget.
Best Flooring for Recording Studios
Here is a brief overview of the 4 best flooring for home recording studios:
Properties
Hardwood
Cork
Laminate
Vinyl
Price per square foot
$5 to $20
$5 to 14
$3 to $8
$1 to $4
Durability
Excellent
Somewhat Poor
Good
Good
Hardness
Very Hard
Somewhat Soft
Somewhat Hard
Somewhat Hard
Installation
Somewhat Easy, Recommend Professional Support
Somewhat Easy, Recommend Professional Support
Easy, Do It Yourself
Somewhat Easy, Do It Yourself
Cleaning and Maintenance
Very Easy
Somewhat Difficult, may require replacement
Somewhat Easy
Somewhat Easy
Comfort for Long Duration Standing
Somewhat uncomfortable
Very Comfortable
Comfortable
Comfortable
Insulation
Poor
Excellent
Average
Good
Acoustic Properties
Reflective of Most Frequencies
Warmer sounds
Great Sound Insulation
Great Sound Insulation
1.Hardwood Flooring :
It is the most common typeof flooring that you can see in most professional music studios. It will be a bit expensive compared to some others, and you will need professional support to install it.
If your room already has a thick hardwood floor, then you don’t need to replace or do anything fancy with the floor. You may need to add some rugs here and there under your equipment.
Its moisture absorption qualities are excellent and repel water very well. It can be somewhat of a pricey option as it can cost anywhere between $5 to $20 per square foot. To be installed by a professional, you are looking at the $20 per square foot’s upper end.
On the other hand, even though it is the pricier flooring type, you will be saving on cleaning and maintenance due to its hardness and durability in the long run. It is easy to clean, and you will have a lower chance of replacing the tiles.
Adding the rugs or any other additional piece like foams inside the room will depend on factors such as the thickness of the wood, the layout, the ambiance of your studio room, the amount of dryness you want, etc.
Hardwood flooring’s acoustic properties give the sound a natural feel by reflecting most soundwave frequencies. You can make the waves reflected from the floor to balance out with the absorbers and diffusers inside the studio.
Its hardness makes it somewhat less of a comfortable option if your recording purposes involve standing for long hours. You may consider appropriate seating where necessary.
This resultant sound will also depend on the process of acoustic treatment you do with your studio.
So, it would help if you did it properly to get the best out of it. If you neglect this part, then having a hardwood floor will negatively affect a positive one.
You must have come across this one too and heard about it quite a lot. You maybe even be thinking about doing this.
Cork flooring can generally cost anywhere between $5 to $14 per square foot.
There are pros and cons that you need to consider with this type of flooring. Naturally, ithas sound-deadening properties.
And thanks to these sound-deadening properties, it is widely used as flooring material inside studios. Besides using it as a flooring material, it can also be used as a subfloor under another material type.
This is done so to act as a decoupling material between the two adjacent layers or floors. It will help in preventing the transfer of vibrations from one layer to another.
The sound waves’ reflection will be much lower than hardwood floors; it will give off warmer sounds. I have seen many studios using cork flooring in control rooms.
It is good with the feet and suitable for standing long hours due to its ability to absorb pressure. Don’t forget to seal the floor properly and check once in a while as it is not as waterproof in nature as the other options for a recording studio floor. Implementing a protective coating to cork will improve its water resistance.
The cork’s unique properties seem to be highly affected by the changing temperature and humidity, so it may be important to control temperature and humidity within the room. This can easily be solved by keeping a cheap dehumidifier in the studio. If you want to keep the cork hard, you ideally want to keep the room cool enough but not so cool that it impacts any vocal performers’ performance.
The con is that it is not that durable, and you will see many others turn down cork flooring due to this factor. It is expensive too, in the same price range as hardwood floors. They are vulnerable to dimples and dents from equipment.
Laminate flooring is a popular choice and a good flooring type that you can find pretty much everywhere. You can use this type of flooring for most types of purposes.
Laminate flooring is a cheaper option for recording studio floors costing from $3 to $8 per square foot.
By Enoch Lai at English Wikipedia [Public domain], via Wikimedia Commons
They are known as floating floors as they don’t need any nailing or gluing to the subfloor.
It is made up of different materials by fusing them,so it is a multi-layer product. Laminate flooring is quite popular nowadays due to its advantages over others.
Laminate floorings are easy to install, and you don’t need any expertise to do a good job on them. The best part is that it is not expensive as compared to other types of floorings.
I can say that this flooring will come at the top 3 when we choose the type of flooring for a home recording studio.
The advantages are its durability, lower price range, ease to clean and maintain, install, a wide range of colors and styles, water-resistant.
It won’t reach the kind of reflections that you get from a hardwood floor for a home studio, and the warmth won’t be much compared to the latter.
But, it will do quite well compared to other counterparts. Well, you can’t compare an expensive one with a cheap one.
You will be getting a bang for the price range you are paying for flooring your home studio. You can definitely go with this if you want to save some bucks.
If you want to know more here is an article on the price of different floors and their installation cost.
4.Vinyl Flooring :
It is another type of flooring that uses artificial material. I have seen studios using this type of flooring and it handles the traffic inside the studio very well.
It is also known as tile flooring.
The price can go from around $1 to $4 per square foot, depending on the appearance and texture that you are opting for. This makes vinyl the cheapest option for recording studio flooring.
There are two main methods by which vinyl tile floors can be made: Inlay Vinyl Tile and Rotogravure.
Inlay Vinyl Tile is the most durable of the two methods and is made to allow the floor to go through to the backing. The durability comes from being manufactured with multiple layers of vinyl.
The Rotogravure process involves printing the design with vinyl ink onto a mineral felt backing often coated with a wear layer. The protective coating is there as an attempt to improve its durability.
The pros of vinyl flooring are that it is durable, water-resistant, easy to clean, somewhat scratch-resistant to some extent, and it also comes in a wide range of colors and textures that you can choose from. On the other hand, they are vulnerable to dimples and dents from equipment. Vinyl flooring is generally better in the domain of resistance against water and durability.
Vinyl tiles can also insulate well from heat and sound. These are the main reasons why it is used in studios.
It is also very affordable and has the same price range as laminate floors.
The performance part depends on various factors such as how you install it, what type of sub-floors you have, the type of treatment you have done or will do.
Your room/studio will respond very differently depending on these factors. You can test it out after finishing and see where you can make it better.
Looking at the price for installing it at your recording studio, it will be a green light from me.
Concrete flooring would actually be the ideal choice for durable flooring options and a hard reflective surface. The biggest problem is that you probably would consider it pleasant for the studio, and you are unlikely going to get concrete flooring within a house unless it was a basement or a garage.
Along with not being aesthetically pleasing to the eye, it also would not be suitable for long durations of standing.
Carpet flooring
Carpet flooring would be an example of the least desirable flooring for home studio recording purposes. This example of soft flooring attenuates and absorbs medium and high-frequency soundwaves but, at the same time, reflects low-frequency soundwaves. This gives carpet poor acoustic properties.
On top of that, it wears out very quickly and holds a lot of dirt and dust, making it difficult and expensive to clean and maintain and worsen the acoustic properties.
Porcelain and ceramic tiles can be a useful alternative and most certainly better than carpet. They do offer the hardness that supports the reflection of most sound frequencies. Porcelain and ceramic tiles would not be a cost-efficient choice of flooring, nor are they the most durable as the involvement of moving heavy objects, including large kits or instruments, may risk breakages of the tiles.
Fixing or replacing porcelain or ceramic tiles would be incredibly difficult, especially when it comes to the removal of the individual tiles. This would include a considerable amount of manual labor of chipping away the sealant and broken parts of the tiles, not to mention the mass clean up requirement.
What is the Best Flooring for a recording studio?
It will come down to how much of a budget that you can invest in it, plus what you will get out of it.
In my opinion, I would go with the hardwood flooring or laminate flooring. Considering everything that I could think of, these two will be the best for studio flooring, among the others.
You can go with hardwood floors if you have the money for it, or you could settle for the laminate floors if you don’t have a big budget. You can still manage pretty well with laminate too.
You can do it yourself if you want, but I think it will be best to hire someone to handle the installation of something like hardwood floors.
As it is an expensive one and you won’t want to mess it up. Don’t cheap out on that part if you are going to install expensive ones.
If you are going to install it yourself, you will need to research how to do it properly.
You don’t want to miss out on something like adding a sub-layer before installing the laminate floors to deaden sounds, keeping spaces for expansions, etc.
There are small but important things that go into while flooring a studio. So, make sure you are covering the portion properly.
There are other flooring types, too, but I have mentioned only some of them, which are common and suitable for studio flooring.
As well as the flooring, it is also important to take into consideration the walls too. You will need to choose the right material for your wall as it contributes a lot to your studio’s soundproofing.
Make sure you look long term and take a bigger perspective of investing in your home recording studio. Using a budget and drawing up a hierarchy of importance will be necessary to not overspend on flooring and sacrifice in other aspects.
There are many ways to record a song with background music or instrumentals. Recording songs has never been easier since we have easy access to various apps and software options. Some methods may require a bit of an investment, while other methods may be free. If you want a high-quality result, then for sure, it will cost you some bucks.
So how do you record yourself singing with background music? To record songs with background music, first, download a karaoke app like SingPlay. Then find your chosen track to download to the app. Finally, open your track through the app and then press record to sing over the track whilst it plays.
I will be including alternative professional methods at the end, too (P.S. – this will cost some bucks, but the end product will be better)
Here are 3 ways you could record a song with background music:
Using only a smartphone.
Using only a laptop or PC.
Using dedicated equipment.
How to Record Songs with a Background Music App?
You can record a song with background music with apps. We recommend using SingPlay. This is the best Karaoke app to record songs with background music.
You can easily do this with apps that would act as a voice recorder with background music for your Android Smartphones or iPhones.
There are plenty of apps that you can sing a song with the music you want as background music.
You will not need anything more than your smartphone to do this. You could potentially use an external microphone so that your vocals sound better.
Record your Song with Background Music on an App
Step 1 – Download App
First of all, you have to download an app to record singing with music – such as “SingPlay” (free) from the Playstore for Android or Appstore for IOS, which you will use to record the song into the background music.
There are other similar apps out there, and you can use any other app if you find something else that you prefer.
Step 2 – Choose Music Track
Now, open the app, and you will see all the music you have on your device. You will see that you can choose any music you like by using different options.
Note: you cannot directly use this music to record as they are not music tracks, and they are the song itself with the vocals and all. What you need is only the instrumental music track or the karaoke music.
Step 3 – Download Music Track
You have to download the music track for the song you like to sing. You can easily find the music tracks online by searching on Google like “karaoke music for ….”, “Music track for ….” or “Instrumental for…”.
Step 4 – Open Music Track
After you have downloaded the track, Open the app and search for the music on the folder you have downloaded it
Click on the Music, and the recording dashboard with the music you have selected will show up.
Step 5 – Record Your Track
Hit the record button, and you can do your thing. You should wear headphones so that you can record better.
And make sure you are recording in a good environment where noise is minimal, or it will ruin your recording very easily.
If you want to do more with your record, like editing and adding effects, then you can download apps like EZ voice, Voice FX, etc., which can alter or add effects to your original recording. These are third party audio editing tools.
Recording with “Smule”
You might have heard about it. It’s a top-rated singing app that is available for both Android and IOS. You can sing solos, duets, even groups if you like.
You can send invites personally or keep them public. There is a free version and a paid VIP version. In the free version, you have limited access to songs.
If you want to sing a song on the VIP list for free, you have to watch some ads, and you will get access to it.
The VIP access price goes like this – $2.99/week, $7.99/month, $39.99/year. With this, you will get unlimited access to the songbook without any interruption from ads.
You can add audio and video effects to your original recordings too. It’s pretty much an all in one app for singers.
How to record a song with background music using a Laptop or PC?
All you need is a laptop or PC that you are going to use to record. And you don’t need a high spec one too, your personal computer that you have will do the job very well.
The next thing you will need is software for your pc where you can record the song into the background music you like. There are different free and paid software out there that can do this.
But for this, I think you can manage with a free one. You can use Audacity, a free music recording software, which can pretty much do everything that we are talking about and more.
This is how the dashboard looks like –
You can remove the noise, edit, cut, change the amplitude, add multiple tracks together, whether they are original recordings, multiple songs, vocal cords, etc. You will be able to manage audio clips, making the editing process a lot easier.
Of course, it is free too. Just visit their website, and you can download the software for free.
After you have downloaded and installed Audacity, open it, and you can load the music track or the background music you want from the Audacity dashboard.
Then you can press the record button to record the song into the background music track. I suggest using a proper microphone like this USB Microphone if you are going with this method.
TONOR USB Microphone for PC, Cardioid Condenser Computer Mic with Tripod Stand, Pop Filter, Shock Mount for Gaming, Streaming, Podcasting, YouTube
Plug and Play: With a USB 2.0 data port, no additional driver is required. TC30 is compatible with…
Cardioid Pickup Pattern: The mic has a cardioid pickup pattern and an excellent off-axis suppression…
Easy to Install: Without any assembly, only need to attach the pop filter to the mic tripod, then it…
Last update on 2025-07-18 / Affiliate links / Images from Amazon Product Advertising API
It’s because the built-in mics won’t be that good, and even if you use the mics present at your headphones, the quality won’t be that good.
Besides, USB mics are generally not expensive, and you can always add something that will give your recordings a boost.
Warning: Do not forget to hear the background music using headphones while you are recording your vocals. If you don’t use headphones, then all the music will get picked up by your mic.
This could ruin your recording, so take care of this too.
By the way, you can record all the instruments using only the mic, audacity, and your pc. The quality won’t be at the top, but still, you can see how easy it is to record a song nowadays.
If you don’t know where to get the music tracks, check the article on karaoke music websites where you will find some of the best sites – you can even sing online on some of them.
The first piece of equipment needed is a Digital Audio Workstation (DAW) – like audacity but with more functions and complex in nature. It is used for recording, editing, and producing audio files.
The next piece of equipment you need is an Audio Interface where the analog signals are converted to digital ones. Audio interfaces allow you to record your vocals and background music into your PC or laptop by providing all the required connections for microphones, instruments, and synths.
After the conversion, the signals will go into the Digital Audio Workstation, and you can do any editing to make it better.
You are going to need an XLR microphone too. This type of microphone will be much better than the USB mics. They are used for professional settings. XLR microphones offer a lot more adaptability and customization from being linked through an audio interface.
An extremely highly rated XLR microphone I recommend is the Blucoil MXL770. It is under $100, and the sound quality is phenomenal for the price you pay. If you do not believe me – check out the reviews here.
blucoil MXL 770 Cardioid Condenser Microphone Bundle with Shock Isolation Mount, 10-FT Balanced XLR Cable, and Pop Filter Windscreen
PROVIDES WIDE DYNAMIC RANGE AND LOW NOISE – The MXL 770 Microphone employs premium FET pre-amp and…
REDUCES UNWANTED RUMBLES – The low-frequency roll-off minimizes the undesirable ambient room noise…
PROVIDES SUFFICIENT NOISE ISOLATION – The cardioid polar pattern of MXL 70 picks up sounds in front…
Last update on 2025-07-18 / Affiliate links / Images from Amazon Product Advertising API
The mics that you see inside a recording studio are XLR ones. All you have to do is plug the mic into the Audio Interface and start recording using the Digital Audio Workstation.
Now all you have to do is load the background music at the Digital Audio Workstation and add a new track where you will be singing. Don’t forget to use a pair of headphones to hear the music track.
You can also record a whole band using this setup and create a whole song with the gears. I know this is a bit overwhelming and kind of sounds difficult.
You will need to learn the basics of using the gear and software to record like this.
However, you can go with the first two ways if you want the easy way.
My name is Vinnie! I am excited to bring you this blog to help you create your own studio at home, whether it’s for photography, recording audio, podcasts or videos!
I have always had a passion for recording and producing content for others since I went to university. I helped numerous people set up their home studios for recording YouTube videos, songs, and other purposes in the past. I have also helped friends set up their home photography studios too.
I hope you find what you are looking for, so search around!!
No product reviewed on this website is sponsored by any company. If something of that case happens then, we will let you know about it.
Expert Contributors
Our expert contributors have a wealth of experience within the field of playing instruments, music production, and managing recording studios. Together, we bring a wide range of experiences to our site through the content we develop.
Adam Coolong
Nik Johnson
Adam Coolong has played with his band Wild Colonial Bhoys full-time for over fifteen years and has recorded dozens of albums through his studio business, Varsity Audio Recording Services.
Professional Links: Band Website, Varsity Recording Website, AirGigs
Nik Johnson, after getting his first drum set at the age of 11, knew music would always hold a dear place in his heart. He has been in countless bands over the years and has had the great pleasure of touring the country and meeting some great people along the way!
Robert Ruby
Dom Purdie
Robert Ruby is a professional musician based in Hollywood. He operates a small music studio just outside Downtown Los Angeles. Robert loves to keep busy with a diverse array of music projects, taking on anything that interests him. He has written hundreds of songs, composed soundtracks for games and short films, arranged and produced music for musicals, and produced music for other musicians.
Professional Links: Website, SoundBetter, AirGigs, YouTube, Instagram
Damon Siseman
Damon Siseman is a part-time audio engineer, part-time writer from Surrey, UK. He holds a Bachelor’s degree in Music from the University of Plymouth and ARSM Diploma in Piano. With 5 years of experience in music production, he has a keen interest in all things musical and makes it his goal to help independent musicians achieve the professional-quality sound of their dreams.
You can find more from him at: https://f4rsideaudio.carrd.co/
Dom Purdie is an audio engineer/music producer/composer based in the United Kingdom. He graduated from Bath Spa University in 2019 with BA in Creative Music Technology. Since then, he has worked as a freelance audio engineer for artists and producers, as well as working on audio for lm with experience as a dubbing mixer, composer, and sound designer. He has released electronic music under the name “Audiorate” as well as a non-musical sound art piece under his own name titled “Sticky Situation”. Professional links: LinkedIn, IMDb
Ciaran Cosway
Ciarán Jai Cosway is a music composer and producer with a particular interest in the field of games. He enjoys creating orchestral, and acoustic music, but is also known for writing in retro and electronic styles. Graduating with a First Class Bachelor’s degree in music, he wishes to share his knowledge of composition, and music technology in order to help those going in a similar direction. To hear his music, or to get in touch, then visit his website at:
https://www.ciarancosway.com/
Trey Porter
Trey Porter is a writer and musician from Santa Cruz, California. His passion for writing started at UC Santa Cruz in 2017 where he majored in Creative Writing. He ended up transferring to Massey University to Study Commercial music in 2018/2019 to follow his interests. For the past four years he has been working on a music album called “University Waves,” which is a conceptual album about University experience, surfing, music, and personal development. He is working a new project called “Offside,” which combines edgy comedy and music and hopefully includes a lot of visual art.