Blog

  • Make Your Home Studio look Professional

    makeyourhomestudiolookprofessional

    Sometimes we hear “You don’t need to pay attention to the looks. As it really doesn’t help you in the process.”

    But it’s an important thing to look out for when you build a home recording studio

    The place is where all the amazing things will take place. You need a pleasant environment for you to record or mix great quality music.

    It’s an important aspect that you need to pay attention to as it will help you influence your mood too.

    We are not only talking about making it look professional, it should have the feels that inspires you to produce great tracks.

    We all know emotions are a great deal in producing music. So, we better take care of this too.

    These are some of the things that I think will help you attain that professional look and give you an inspiring feel.

    Let’s think about how we are going to do it. We need a plan on how we are going to make it look and feel the way we like.

    So, the first step is Planning it out before we do anything else and do it in a systematic order to make it easier.

    Steps to make Music Studio look Professional

    Step 1: Let’s move out

    No, I don’t mean to move to another place. What I meant is to move all the gears to another place for a while.

    And we are going to do a makeover for your home studio. After you have moved out all the gears, keep them at a place.

    Step 2 : Clean up the room

    I know we have moved out the gears from the room but the room needs to be tidy before we add any additional things.

    If you have a clean room, then it is ok. But I hardly think that will be the case. So, just clean up the room.

    Moreover, if you have anything hanging on the walls and the ceilings, then you should clean those too.

    Get rid of the things such as a canvas, posters, or anything that will mess up the professional look when you visualize it.

    It’s always good to have your space clean. Having a clean environment around your workspace will give you a boost during various processes.

    It’s a creative environment that we are trying to achieve here – and for this Neat and Tidy is the number 1 rule.

    I say this from my experience, I have two small siblings and the main thing they like is to disturb and litter inside the studio.

    The thing is that when I record or do mixing – the day when there aren’t any litter and disturbances I tend to be more creative and productive too.

    It is because the ecosystem is clean and calm giving me a boost in my creative work.

    I think you have experienced it too.

    Step 3 : Position the gears

    Now you have to bring all the gears back inside the studio. But you are going to keep it in a good position.

    A position that will help you enhance the look plus give you the best out of your setup.

    I say this because the position of the gears you have at your setup will greatly influence the reflections of the sounds inside the room.

    So you need to choose a position that will fulfill both the criteria as much as possible.

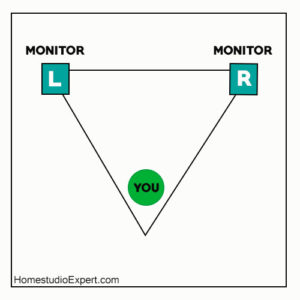
    A little tip for positioning your gears inside the room – Try to keep it at a place so that the room is symmetric in nature.

    So that the reflections inside the room are symmetric. This will greatly improve your home studioOpens in a new tab..

    You can read about this in more depth from this article by Proaudiofiles.

    pexels cristian benavides 2049411 1

    Step 4 : Cable Management

    We need to clean up all the cables as much as possible. We all know the mess it can do to the looks of our studio.

    You can carry most of the cables under the desk where you mount your pc or interfaces using cable clips or hangers.

    On the other hand, there will be ones that you can’t hide under the desk. For this type of cables try to bring them together.

    Try to prevent the cables from lying here and there on the floor. Instead, make them go on a single line.

    So that it won’t look or become messy around the floor.

    Also if you are making them go on a single line, there will be magnetic field interference between the wires.

    And to prevent humming or buzzing effects created by this thing, use DI boxesOpens in a new tab. when you record electric guitars, keyboards, etc.

    There are videos and articles on how to do cable management too. Be sure to check them out when doing this part. It will help you save time.

    With the advancement of technology, there will be a time where we can work effectively with wireless gears and consoles.

    But for now, it is yet to happen. As there are many problems that we face when we try to go wireless with all the things

    Therefore, we have to handle it manually.

    Step 5 : Decoration

    Yepp… You read it correctly, decoration is a big part here. You really need to decorate it to your feels.

    After all, it is yours to begin with and you have to make it look the way you want.

    Decorate it in a way such that it will give you inspiration for the songs or music you make. As I have told you it’s about emotions.

    What we are creating is a creative environment. It should match the type of music you are making.

    The colors of your walls and the canvas you put upon them must match the vibe you want to be inside your room.

    You can change the color of your walls if you want a new look. You can easily do it with plain and simple wallpapers.

    But I think simple and basic is the key to everything. You can pretty much record and mix inside this environment for various types of Genre.

    Well, it’s not mine that we are talking about here, so you should choose something that will suit you and your music.

    Step 6 : Make it your own

    When you decorate or add something to the room you need to make it your own. Yes, you need to make a pleasant environment.

    In addition to the pleasant environment, you should add something that makes or represents who you are.

    It can be a poster with a quote from an amazing personality that inspires your emotion.  Or maybe art that you love getting a glimpse of it.

    It should be something that motivates you and your emotions. You really need this and I can guarantee you that it will help you a lot.

    Will give you that extra boost when you feel down.

    You can also add lightings to your room as they play an important part in how a Studio feels like.

    You should match it with the kind of vibe you want your studio to feel like. It can go from being a little funky to simple white lights.

    You can use RGB lights too if you want to decorate your desk and setup. Add your own things here as I am not good at these things.

    Want to Setup your Home Recording StudioOpens in a new tab. Under 400$ or Under 1000$! Then you can Learn More about Some of the BestOpens in a new tab. Setups for different price ranges we have prepared forOpens in a new tab. you!

    Some Tips

    Less is good

    I see a lot of people getting that unnecessary stuff and filling their studio with it. And they even hardly use them.

    Get rid of the stuff that you don’t really use and don’t belong in your studio. Let’s minimize the number of gears that you have on your setup.

    Only keep the needed gears on your desk. Keep it Simple and Basic – that’s the best thing you could do.

    pexels dmitry demidov 3774606

    Gears/Instruments

    Keep the gears/instruments that you use within your reach. You can put them all around your sitting position or on a separate region for the gears only.

    There are different types of positions that you can go with while keeping the gears around you.

    You can keep all the gears around you in a circle so that you can reach it at anytime conveniently. Another way is to keep only some of the gears near you.

    While you set up a different region like a second space for other gears or where other people such as your partners can use while you monitor from the desk.

    Conclusion

    The above are the main steps that you need to take and pay attention to. I can surely say that if you take care of the above things then you will surely improve the looks on your Studio.

    If you like the content, then be sure to check out the other related ones too.

    Was this article helpful?
    YesNo

  • How to Record a Song at Home from Scratch

    recordasongathomemain

    Way back in old days we really couldn’t do something like this as Record a song at home. And it would totally be impossible if we tried too.

    There was a lack of equipment that we have nowadays. Plus the gears available at that time period were not meant to record songs at home and they made all those loud humming noises – coming from different gears.

    You must sing or record your gears loudly as much as possible. So, the level of sound being produced from you will overcome or subdue the sounds produced from the gears.

    And many other challenges were faced. But, we don’t have any of this problem as compared to those days. We live in a generation where recording a songOpens in a new tab. at home is fairly easy and cheap.

    You don’t need anything fancy and technical stuff to start recording a song from scratch. And you don’t need to be an expert on it. Just learn as you go and you will learn all the things necessary to produce a great song or record.

    Main Things Needed

    There are two main things needed to record a song at home. They are –

    1. Some basic Gears are needed to start recording.
    2. The process of recording a song from scratch to arranging, cutting, mixing, mastering, etc.

    We are going to discuss these two main things in depth so as to help you out in your song or music-making process.

    Gears Needed

    We are always going to need some of the gears available for use in the market, but we won’t be using all of them. Although you can use all of the recommended gears, it is not that necessary or compulsory.

    We can still manage with some of the main gears that are absolutely needed to start recording at your home.

    Some of the gears needed are :

    1. A computer (laptop or desktop) –

    If you have any one of these then you don’t need to buy a new one, I also assume that you have one of these and probably you are reading this on a laptop or a desktop.

    On the other hand, get a reasonable one that can run the software that we are going to use to record our songs or records – if don’t have one or need an upgrade.

    I think most of the systems can handle the software that we are going to use pretty easily.

    Yes, you can use other gears to record your song or mix it into but they are a little bit expensive. Moreover, they require some technical knowledge to do so.

    But we all know how to use computers nowadays and own one or two of them. Therefore, all these points to using a computer as the best option – user friendly and cheap.

    pexels little visuals 1784

    2. DAW (Digital Audio Workstation) –

    It is the software that I mentioned above, which we are going to install on our computer and use it to record our songs or mix in it.

    There are different types of them from different companies and you have to choose only one that is to your liking and work with it. They are not that different from each other as far as the functions are concerned.

    There are both free and paid ones, obviously, the paid one will have more options and advanced functions. But, you can still manage with only the free tools and produce a dope song or record.

    While some of the paid and free tools will be included when you buy an Audio Interface (coming up on the next part) – comes bundled with them. So, no need to worry about it.

    3. Audio Interface –

    It is the gear that will help us connect our microphones, guitars, drums, etc to our computer through it. You may be thinking “Can’t we record without it?

    Yes, you can do it only with your computer as they also have their own standard audio interface. The important thing you should know about using your computer is that the inbuilt standard audio interface is not meant to record high-quality audio.

    They don’t have many options for it too and you can’t monitor your records properly too. The number of outputs and inputs your computer supports are also very low compared to the dedicated audio interface.

    So you should always use a dedicated Audi Interface. With the dedicated one – it comes with no inputs and outputs for different gears that you can use.

    Check out our Recommended Audio InterfacesOpens in a new tab. from our Resource pageOpens in a new tab. which gives you a better choice for your budget

    4. A Microphone –

    This is a must needed gear for your project. Microphones are also of different types and you need something that is going to fit your project.

    I recommend having a separate microphone for your vocals and another for your gears. Different types of microphones are meant for different purposes. An example is that you should use A large diaphragm Condenser Mic for your vocals.

    So better check other posts and articles on different types of microphonesOpens in a new tab. so that you can get a better understanding of what type of mic that you are going to use for your gears.

    I suggest getting only about two of them – one for vocal and another one for your gears. By the way, you can still manage with only one if you don’t have the budget. You can always add new ones to your collection as time goes.

    Here is our Favourite MicrophonesOpens in a new tab..

    Pop Filter – It is an accessory for your mic that is very important if you are recording vocals. You should definitely get one of these. What it basically does is “Remove the popping sounds created by the blasting of airs.”

    These popping sounds are generally created when we say letters like “P”, “T”, etc., or have their pronunciation when we speak. The best part is that they are cheap and affordable too, won’t hurt anyone when you get one for yourself.

    Untitled design 17 1

    5. A pair of headphones or Monitors –

    The last piece of the puzzle is a pair of headphones or monitors so that we can analyze the records or mixes that we are developing.

    Some say recording using only a pair of headphones is better while others say monitors are compulsory. And the debate has been going on for decades.

    The truth is that these two are very different from each other and their working principle also differs. Hence, you have to use them for specific situations.

    But here we are going to use only one of them – preferably only a pair of headphones as it is more affordable compared to a pair of monitors. Moreover, you have to set up your room so as to let the monitors work at a desired level of ambiance if you use the latter.

    And Our Favourite Headphones list.Opens in a new tab.

    If you want something that goes into how Headphones and Monitors differ from each other, then you can check my post on Comparisons between headphones and MonitorsOpens in a new tab. which goes into a little bit deeper.

    Something You Need to Take Care of

    Now, you have all the gears that are needed to record a song. Before we go into the next part of the process i.e. “Start recording our song or music” we need to Soundproof our home studio.

    This step is a must as we are going to record a song. You will hear all the annoying background noises if we skip this step. It is because of the fact that all the background noises will be picked up very easily by your Studio Mics.

    Even the slightest change will be picked up very easily. If you have done it then you can jump to the next part of the process.

    If not – you can refer to this articleOpens in a new tab. on how to do it.

    Recording the Song

    Recording Songs and editing them is way easier nowadays as compared to the early days. We have so much freedom with the amount of manipulation we can do with our tracks.

    We can edit, rearrange, copy, duplicate the tracks and analyze them at the same time very easily with just one click at our laptops or desktops. We can even cut off various parts and add virtually produce sounds to make it perfect.

    My recommendation on this is not to use too many of these virtual ones and solely rely on the tools. If you use too many of them, then your track will lose natural characteristics.

    On the other hand, you can use them if you are producing electronic ones. But, for our project use them when you think it’s necessary.

    Like many others recording a song also needs planning, a step-by-step process so as to make the recording easier, quicker, and more efficient in nature.

    Step 1 : Creating a Guide Track

    This is the baseline of creating a song from scratch. This track will be the guide of the whole recording process which you can discard after you have a good track that you can use as a reference track.

    It can be a drum loop or a virtual rhythm or anything like this which you can use as a guide for the upcoming process. You can use a basic drum loop that you can find anywhere online.

    And after that change the rhythm of the drum loop to your liking. There is something you need to take care of when you are developing the rhythm of the guide track i.e. the tempo of the guide track.

    The tempo of the track will also play a very important role when you record the other instruments and vocals. So, be sure to tune it properly to fit the kind of tempo you want your song to be.

    Here is a video on how to set up a drum loop

    Step 2 : Recording the various instruments and vocals

    Some people have different opinions on this that vocals should be recorded along with the gears while others say the gears should be recorded first and the vocals at the last.

    For me, I would go with recording the instruments first and the vocals the last. This gives an upper hand when you record the vocals as recording vocals is about the feels .. you know what I mean Right!!

    It’s the music that gives you that feeling and it adds up to our vocals by giving a boost in our emotions.

    Now, first of all, you record an instrument that you are going to use as a guide track (using the scratch track made above in the first step). After this, record other instruments using this newly made guide track as the base.

    When you are recording the instruments, either record the drums or the bass guitar first. I have seen most of the people recording the bass guitar first, but you can still go with the drums if you like.

    After this, you can basically record any instruments in any order.

    When you have finish recording all the instruments then finish it with recording the vocals. Take it easy and slow on this and please don’t be hasty when you do this part. Relax your mind and try to pull out the best from you.

    Some tips
    • Take three or four duplicate tracks for each instrument and your vocals. You can choose the best among them later and use them for editing.
    • If you are not a professional on various instruments or you don’t have a band to play the instruments for you, you can just outsource them.

    Step 3 : Editing Process

    This is where you utilize the power of the DAWs. You can edit the tracks, cut off various parts and replace them with new and better ones from the duplicate tracks that I suggested you to to take.

    No matter how careful you are when you are recording vocals or any other instruments, you will always make mistakes. And this is where you correct them.

    Some of the other things you can do are :

    • You can edit the time, pitch, etc. of the tracks.
    • Remove background noises or any other unwanted noises.
    • You can add background music, fillers, pre-made sound effects, etc. on the tracks to make it better.

    Step 4 : Mixing and Mastering

    It is the step in which you mix all the tracks together and try to produce the complete song that you have been creating all this time.

    When you are mixing the tracks altogether try to analyze them very carefully as it is nearing the final step of the whole process.

    Rearrange the positions of the tracks in their timeline so that they fit in their right place. Make sure there aren’t any off beats and unbalanced parts. You can also use different duplicate tracks that you took and check which one fits the best.

    Take your time and come up with the best track as much as possible. After this let’s go to the Final step of the whole process and that is Mastering.

    Mastering

    It is the process in which the final track of the song is going to be prepared for production and distribution for various devices and formats. This is the step where we will also add the final touch to our song.

    And I highly recommend you to outsource this step to an expert. You can do it yourself but won’t be that good at all and maybe even make your song worse.

    If you are not producing it for the public or professional manner then you can just skip this step. Now, you have your final product.

    Here is a More detailed Guide from a person who has more experience:  Song Recording and ProductionOpens in a new tab.

    Was this article helpful?
    YesNo

  • Rivera RockCrusher Power Attenuator Review. What users say?

    As we all know that a perfect balance of v0lume with the kind of lyrics will make the music even more better. Volume also helps to pump up every performance . And to make everything perfect, the attenuators comes into the picture. The attenuator has made it possible to cut into an amp or even to change the circuit to fix the master volume. 

    ir?t=homestudioex 20&l=li3&o=1&a=B005HYLCNIRivera offers all the music enthusiasts one of the finest attenuators. The most powerful amps could be worked upon easily with it, which undoubtedly makes it a getaway to a blissful tube-amp tonal.

    The Rivera Rock Crusher lets you turn up the tube amp to the sweetest tonal spot it can attain.  By keeping it in the middle of the speaker cabinet and amp, one can easily crank up the ton of the amp even when the volume is kept down.

    It also keeps a balanced relativity between impedance and the reactance (inductive/capacitive). Talking in terms of the guitar, it helps in pushing the amp to its upper limit, while doing so it helps the tubes attain their tonal potential even while keeping the volume low.

    What makes the Rivera RockCrusher unique?

    There’s a lot of reasons as to why Rivera rock crusher is a potential product for all the guitar enthusiasts. Here are a few reasons which highlight the unique features of the product:

    • An individual needn’t worry about any mic choice or placement.
    • It helps one attain the actual tone of the amp for the in-ear monitoring.
    • For the purpose of home recordings, it helps one record the real tone of the tube without even waking up the baby.
    • For professional uses as well, it provides greater mic isolation even during live sessions.
    • One can leave their home cabinet and still get great tones.
    • The feature of the expanded volume control system opens up the possibilities of mixing.

    Overview of the Features

    Main features

    • The bombproof construction helps one achieve even the wildest gigs.
    • The 8 ohm and the 16 ohm models of the crusher let one use the rock crusher with any amp or speaker combination.
    • The tonal transparency of the rock crusher helps one hear their amp.
    • Also, the Rivera rock crusher lets the user listen to his own tube amp’s tone.
    • The balanced XLR and also the unbalanced ¼” output of the rock crusher help the user easily interface the recording gear.
    • Perfect and natural tone balance at any and every level.
    • The reactive internal network helps in true amplifier/load interaction.
    • It provides tight impedance tolerances.
    • The versatile and enormous internal components.
    • It has a full bypass capability without any insertion loss.
    • The thermal capacity of the product ensures a cool running and longer life.
    • The functioning capacity of the attenuator goes up to a capacity of 120W RMS.

    In Depth –

    The Rivera Rock Crusher has a power handling capacity of about 120W RMS, and an impedance of 8/16 ohms. The input channelizes in the form of 1*1/4” of the amplifier; and the output is in the unit of 2*1/4” measured from the speaker output, and from the line out in 1*XLR, 1*1/4”.

    This amazing product is remarkably known for its versatility as it can be used as a power attenuator and even as a load box while sending out the balanced XLR or the unbalanced  ¼” line out to the other amp as a slave; and also send the output to a mixer for the purpose of recording and even for live.

    When maintaining a constant tone is still a challenge for other attenuators, the Rivera rock crusher proves to be the best and also the most professional unit available out in the market.

    The product is build into a reactive load of networks which helps achieve proper speaker to amplifier interaction. The counterparts available out in the market which have purely resistive loads; the rivera rock crusher comes with a surety that both the amplifier and the speaker sees each other in a perfect relation of both the impedance and the inductive/capacitive reactance.

    This further helps translate to a much superior tone, regardless of the level. Also, it helps achieve and enhance the tonal balance, shimmer and warmth, and in order to achieve this; the product comes with edge and warm switches which helps one have a total control on the final output.

    In addition to all of this, the product provides a much superior tone and impedance which matches perfectly with the longevity and the good health of the amp. Also, the 8/16 ohm selector of the crusher can be easily switched so as to attain an accurate match with the cabinets and amplifier.

    As well the inbuilt features makes it user friendly both onstage and in the studios as well. One can even use the amp along with a speaker cabinet even when a full output level is required; and in order to achieve so, the crusher is imbibed with a front panel bypass switch which helps remove the entire load.

    In order to achieve a low speaker volume, the studio position of the selector attenuator level enables the control level of the studio to help adjust from a low to a quiet output, which is ideal for project, home and also studio recordings.

    The balanced XLR and the unbalanced ¼” jacks of the phone allow interfacing with every audio equipment. Imbibed with two speaker jack the crusher provides an easy connection with up o two speaker enclosures. A bullet proof construction is one of the USP of the Rivera equipment.

    A heavy- duty and the rugged industrial grade components are used to make the make the product much reliable, and one of the cool-running service; and the side chassis of the Rock Crusher facilitates the mounting of the ear racks and other brackets for a much professional installation.

    The product has already set a remarkable benchmark in the market too.

    What the users think about the product:

    1.Excellent Tone:  Undoubtedly the product is one of the best attenuators so far. The product has a great tone down low, also the feel and response of the product is similar to a cranked amp.

    2.Consistency at its best: Used along with Egnater 65 head, the user easily sets off the effects pedal parameters to match up with the amp without any gig volumes or blast. It also helps keep the tone perfect consistency. The great tube tones can be enjoyed well in quite settings and the user easily knows when they crank up the volume, the amp and the effects pedal starts to sound the same and consistent.

    3.The perfect topping to the tone: This specially altered boutique amp easily breaks up and provide a mesmerizing perfect tone. This 20 watt amp is loud enough to provide you with the amazing jazz. Also, it attains the volume to the studio level without even compromising on the great tone. Built perfectly for lifetime use, it is versatile and pretty user friendly and also a true value for money.

    4.The phenomenal piece: A perfect solution to the amp which solves the problem of loudness even at the lowest gain settings. It makes it possible for the user to even crank the boogie, without even bothering the neighbors. A onetime investment; it is totally worth and is imbibed with amazing studio applications.

    5.The Perfect tone for every Occasion: The tube amp coordinates with the load of the impedance which is put on the amp’s output by the speaker cabinet. The hooking the direct output of the amp to a recording device, the desired tone won’t be achieved. The Rivera Rock Crusher interacts with all the amp tubes and thus provides the articulate desired tone. The user can thus harness all the tones, which are designed to put out, thus eventually getting the sound of the pedals and amp; and all that without even worrying about the volume. When onstage, it lets the user achieve better monitoring situation even at decreased volume of the stage. In a nutshell, it provides a no compromise guitar tone, even without bleeding the sound into the other mics.

    Buyers guide –

    Why to Buy?

    If you can’t compromise on the tone or feel of the sound, and you need something to team up with your vintage or the modern amps, which needs a little taming to it.

    Why not to buy?

    If you are the one who plays on a regular basis the cobo hall with its six stacks or even you run up the lowered powdered amps with master volume, then this product is definitely not meant for you

    Conclusion:

    The entire task of attenuation is no child’s play. It requires a lot of serious work and perfection. Apart from the factor which is outside of the tone, the major consideration is about retaining the feel, response and touch that every individual loves at a higher volume.

    The Rivera RockCrusher did a commendable job, by providing and retaining with much reactive load. The durability and the amazing look of the product lets save the amps from just being chopped off with all the unnecessary modifications.

    It can safely handle up to 100 watt tube of amps with much headroom to be spared. It is the perfect product to help you out in every occasion and lets you work with your amp, in any and every situation.

    Check out our other recommended gear for Home Recording Studios here!Opens in a new tab.

    Was this article helpful?
    YesNo

  • Whirlwind IMP 2 Review. What you should know before you buy it.

    Whirlwind IMP 2 is a Passive DI (Direct Injection) Box and a simple one too. It is very easy to set up and use. Plug and play type thing which is small plus rugged in nature.

    You can easily carry it anywhere (portable size). I would say a Budget range DI box which gives a punch for the price range. If you are looking for something in a DI that are in sync with these characteristics, then you should go for this.

    There a lot of better DI Boxes than the Whirlwind IMP 2 but it’s the best for the given price range and You won’t find another DI Box of this caliber.

    The thing is that you can use this DI Box with other instruments too and not only with acoustic and bass guitars. And the main function of a DI Box is to convert an unbalanced input signal to a balanced output signal.

    It was first produced at around 1981 by the Whirlwind Company. They were the first ones to produce DI Boxes for commercial use in the Audio Industry.

    You will find almost all pro studios have this DI box among their gears. The reason is that it can be used for a wide variety of situations and comes as one of the favorite DI Boxes among others.

    Sale

    Whirlwind IMP 2 1-Channel Passive Instrument Direct Box

    • Inexpensive direct box with a fantastic footprint and the sound quality
    • The IMP is an in-line transformer that converts a line or instrument level unbalanced signal to a…
    • Converts a line or instrument level unbalanced signal to a low impedance mic level balanced signal

    Last update on 2025-04-28 / Affiliate links / Images from Amazon Product Advertising API

    Who Is This Product For?

    Many people have their own opinions on this – some say you don’t need it in some situations while others say that you need it in all situations. Now, let’s get into some common sense.

    Ask yourself – Are you producing the music only for yourself or maybe to hear it with your friends?? (not for a professional thing) Then you can manage without the DI box.

    On the other hand, if you are producing music that you plan to publish it for the public audience then the DI Box is a must-have gear. These two factors are also not the only factor that you should consider.

    What I have mentioned above are the two general things you should consider. You can still get it if you want a better quality recording from your acoustic and electric guitars or keyboards, etc. (as long as they are instrument level signals)

    As they will help in balancing the input signals, eliminating the humming sound effects, etc. caused by various other factors which I will mention below.

    And if you are going to record live music then this piece of Box is a must-have.

    So, the deciding part is yours and for the info – Not that expensive, you won’t break your bank balance ;). It’s always nice to have something cheap that can enhance the quality of your records.

    Check out the 15 Best Products for a Home Recording Studio here!Opens in a new tab.

    You can Check the Current Price Here.

    Overview of the features

    Some of the main features are –

    1. It comes with a full metal body which is very tough and can handle any type of environment. It has excellent built quality on both the inside and the outside.
    2. It has two 1/4″ input and output jacks which are to take in unbalanced input signals and give out balanced output signals to an Amp (which is used in live music shows).
    3. It also has an XLR output which is meant for connecting to a recording software which only supports mic level input.
    4. It has a Ground Lift switch which would help in eliminating the humming and buzzing effect caused by electromagnetic interference. Which is done inside the transformer of the DI Box by isolating the Hum and the Buzz
    5. It is small in size and therefore portable in nature. You can carry it anywhere.
    6. Inside the DI Box, it has the Whirlwind’s TRHL Transformer – which is meant for converting high Impedance signals to low Impedance signals and hence the metal cases for better shielding.
    7. It is also used as a splitter for splitting the line level audio signals.
    8. It can be used without any source of power – doesn’t need any extra power for it to work. All you have to do is plug in at the right input or output jack. Now, It’s ready to do the job for you.

    How To Use it

    It is very simple and easy to use. You can plug in an instrument which is unbalanced at the 1/4″ input and it will be balanced by the transformer. The balanced output can be received in two ways.

    As I have mentioned above, it has two output – at which the balanced output can be received. The 1/4″ high output parallel to the input 1/4″ can be used for connection to an Amp if you are going to use it.

    And the other XLR output (low output) is to be used for connection to a Recording or Mixing software. You don’t need a mic to record your instrument if you are using this.

    You can use any type of instrument as long as it gives an instrumental level signal or even line level signals. It will automatically be converted into low-level mic input signals which can be fed to a mixing console.

    You should always use the Ground Lift switch and keep it at the “Ground Lifted Position” as long as possible to avoid any unwanted things from happening. Only keep it at the Grounded Positions when it is necessary like when you use an instrument that needs grounding like a passive guitar.

    Note: You can read all about DI and Ground Lift here at Whirlwind

    For The Information

    There are two types of DI – Active DI and Passive DI

    Active DIs are the one which needs a power source to work like a battery or a phantom power. While Passive DI don’t need a power source to work.

    Passive DIs generally contains a simple transformer to convert a high Impedance signal to a low Impedance signal and they can’t do any type of improvement to the signal as they don’t have an amplifier.

    Whereas in the case of Active DIs they have preamplifiers and can handle even low-level inputs. They are more complex as compared to the Passive ones. They also can provide higher and stronger signals.

    Both of these two types of DI have their own advantage and disadvantages and work the best in their own situations.

    What Other Users Say

    All the owners of this DI Box have given a positive opinion on it and you can find it in the reviews too. And here are some of the important points they had about the product –

    • Using the DI box helps in eliminating the Interruptive sounds and it works great in doing so.
    • It is the perfect gear to use at a stage and record the live performance through it to a mixing console. So, It will be helpful to you if you are doing live performances.
    • It is well built, rugged design and will last for a long time. Does a good job in cleaning up the signals.
    • It provides everything that a DI box would do and at a cheap and affordable price range.
    • It is also one of the DI box recommended by the Whirlwind Company.

    Some Alternatives

    If you want some alternatives to look at before you get one of this, then here are some of the alternatives –

    • Whirlwind Director 1-channel (Passive)
    • Radial ProDI 1-channel (Passive)

    These two a little bit more expensive than the first and you really don’t need to get the expensive one if you don’t need extra stereo inputs and all. They all will give you the same performance and their main difference is at the input part.

    So, choose something that fits your need and buy it.

    Radial Pro DI Passive Direct Box

    • Passive Mono Direct Box with Custom Transfmer Rugged I-beam Construction

    Last update on 2025-04-27 / Affiliate links / Images from Amazon Product Advertising API

    Conclusion

    To keep it Simple and in my opinion, this product is an absolute bang for the price. And the performance it can give with a small sized box is astonishing.

    You can opt for others with greater features for a higher price but it will be hard to find something like it at this price range. It is robust, rugged, and has an excellent built quality which can be used in a rough environment.

    I absolutely vouch for this DI Box that it is of a high-end quality from Whirlwind.

    Was this article helpful?
    YesNo

  • Recommended Audio Interfaces

    When choosing the best audio interface for your studio, there are some key features that you need to look into before getting it.

    Some main key features to look for are:

    • Inputs (How many inputs does it have?)
    • Outputs (How many outputs does it have?)
    • Phantom Power
    • Preamps
    • Portability or Size
    • Latency

    These are the main things that you need to look into when you are getting a good Audio interface for your studio. And you must choose the one that is going to satisfy all your needs.

    You might need more inputs or outputs for different types of instruments that you have. The more inputs it has, the more instruments or mics that you can record simultaneously. Having more outputs will give you the freedom to connect it to multiple channels.

    Generally, only two outputs are commonly used (for beginners)-

    1. One for connecting to a pair of stereo monitors, and
    2. Another one for connecting to a pair of headphones

    If you are going to do vocal and acoustic instruments recording, then you are going to need a large diaphragm condenser mic and for that, you are going to need “Phantom Power” supply so as to make it capable of picking up the smallest details.

    Then comes the “Preamps” which helps in amplifying the sound signature so that the mix or record is reasonably loud and clear compared to the unwanted noise.

    And for “Latency” – lower the latency, the better it is. So just choose the one having lower latency if it satisfies all the other needs.

    A word of caution; many interfaces are marketed to look like they have far more inputs and outputs that are actually useable in a practical recording situation.  Some might say they have “16 inputs”, while they only feature 8 actual XLR inputs that are connected to preamps.

    Take care to look at the pictures themselves, and count the number of XLR connections (the ones with the three small holes in a larger circle) in order to determine how many actual usable inputs an interface has.

    Note : You can always buy them in studio bundles for a better price with all the other essential gears included.

    I’ll give a couple of examples of interfaces I have used, at a couple of different budget levels. There are many to choose from. That can sometimes be really paralyzing.  Hopefully, this narrows it down some for you.

    Budget Audio Interfaces

    1.Focusrite Scarlett 2i2 USB Audio interface – I can’t say enough great things about the Focusrite brand.  They have fantastic sound quality, are really easy to use, it’s not surprising that this little guy is the world’s top-selling USB audio interface.

    Focusrite Scarlett 2i2 (2nd Gen) USB Audio Interface with Pro Tools | First (Renewed)

    • Two natural-sounding Scarlett mic preamps with plenty of even gain; two instrument inputs, 1/4-inch…
    • Class-leading conversion and sample rates up to 192kHz / 24 bit; super-low roundtrip latency for…
    • LIMITED TIME OFFER: FREE Venomode DeeQ, Maximal 2, and Pivot, plug-ins upon registration and…

    Last update on 2025-03-27 / Affiliate links / Images from Amazon Product Advertising API

    I have used one of these (and its bigger brother, the 18i20) on countless recordings, and they’ve been featured on lots of top albums as well, believe it or not!

    The 2i2 has two inputs, and two outputs, “direct monitoring” (which allows you to monitor your signal while tracking directly off the interface, instead of going through your DAW, which can introduce annoying lag to the playback while you’re tracking) via either headphones or monitor speakers, and really is very very simple to operate.

    It’s basically a plug and plays, I especially love how small and portable it is.  You can take it to band practiceOpens in a new tab. and with your laptop do some mobile recording, and it’ll fit in your gig bag.

    A truly quality model that’ll give you years of great use.

    Check out how the Focusrite Scarlett 8i6 compares with Komplete Audio 6 MK2 here!Opens in a new tab.

    Focusrite Scarlett 18i20 (2nd Gen) USB Audio Interface with Pro Tools | First, 18i20 – 8 Mic Pres (AMS-SCARLETT-18I20-2ND-GE)

    • 18 audio inputs and 20 audio outputs; Ten line outputs, MIDI I/O, S/PIDF I/O, and Word Clock Out
    • Eight specially-designed Scarlett Mic Pres with 48V phantom power, low noise, plenty of gain, and…
    • ADAT ports for expanding up to 16 analog inputs and 18 analog outputs

    Last update on 2025-03-27 / Affiliate links / Images from Amazon Product Advertising API

    Premium Audio Interface (Our Pick)

    2. Apogee Duet 2 ir?t=homestudio101 20&language=en US&l=li3&o=1&a=B00BB2QBLIThis simple little interface was the heart of my studio for years.  Apogee is a company known for making top-of-the-line, pristine AD/DA converters, and their upper-level interfaces cost many thousands of dollars.

    This gives you an opportunity to harness that quality at a much lower price.  While at the mid-range price, it’s significantly more than the Focusrite 2i2, the quality is amazing and if you can afford it, go for it.

    It’s simple to use, the sound quality really is tops, and what’s better, this model is now compatible with Windows 10 (it used to be Mac only).  It’s even compatible with Mac iOS, so you can connect it to your iPad and have a truly mobile rig!  It’s crazy what you can do now…

    I used this interface for a long time before I finally decided I needed more inputs and wanted to start recording drumsOpens in a new tab..

    Apogee Duet 2 – 2 Channel USB Audio Interface for Recording Mics, Guitars, Keyboards on MAC and iOS Devices, Made in USA

    • AD/DA conversion for recording up to 192kHz / 24-bit.
    • USB 2.0 High Speed connection to Mac or Windows PC
    • Direct digital connection to iPad and iOS devices (iPhone, iPad and iPod touch. Lightning and 30-pin…

    Last update on 2025-03-27 / Affiliate links / Images from Amazon Product Advertising API

    Want to Setup your Home Recording Studio Under 400$ or Under 1000$! Then you can Learn More about Some of the Best Setups for different price ranges we have prepared fro you!

    Wrapping Up

    While there are many different interfaces to choose from, the good news is, you are going to get great recordings out of pretty much any of them.  The build quality and conversion these days are simply fantastic.  Let the number of inputs you need, your budget and this article help guide you for a start!

    Good luck, and happy recording!

    Was this article helpful?
    YesNo

  • SoundProof Your Home Studio On Cheap and Easily

    soundproofyourhomestudio

    How to SoundProof Your Home Studio On Cheap and Easily

    We all know the annoying background noise (that can be heard on the backend of a record) when we try to record something with our microphones or phones, can be anything else.

    It can be a bit annoying sometimes if you want to record something in a professional manner. And if you want to do something like Soundproofing Your Home Studio in an easy way – I can bet you that you would love this article. So, hold on a little longer.

    Moreover, if you want to get a great quality record with your Home Studio setups, then you really need to cut off all the noise from the outside environment.

    Moreover, the sounds from your studio might disturb others too. Especially, when you have a small kid at your home. We had small kid (about 6 months old) and I had to reduce the sounds escaping from my studio as much as possible.

    Why You need to Soundproof your Home Studio?

    First of all “Soundproofing” is very much different from “Acoustic treatment” , many people get confused between these two and think that they are the same. Let’s have a look into these two.

    Soundproofing – It is the process of blocking all the unwanted sound or noise coming from outside environment to a room and also preventing the sound inside the room from escaping.

    Acoustic Treatment – It is the process in which a room is set up to maintain a level of reverberations or echo (like a desired level of freedom of these factors) so that the records sound the best in that particular room or studio.

    Yes, you need to do both for your studio but we are going to discuss only about Soundproofing on this post. Here is an article on acoustic treatment… if you want to know more

    Some Examples : Just open your recording app on your phone and record something inside your room. Now, hear the record for yourself and you will hear all these different types of noises that you never picked up with your naked ear. And that’s the thing we are trying to eliminate here.

    Imagine it when you use a dedicated microphone to record the same thing – dedicated microphones are able to pick up even the slightest change in audio signatures and therefore, it will be a mess.

    Soundproofing

    There are two way you can soundproof your home Studio or your room :

    • Hire an Expert and let him do the job for you. It will be expensive too if you go to this route but you can just sit and relax while he does his.
    • The Second way is to do it Yourself – you won’t need a large budget and will take a little bit longer as compared to the above. And you don’t need to worry as we are going to talk on how to do it in an easy and effective way.

    For more information, check out how to cheaply soundproof a door.Opens in a new tab.

    Some Easy Steps :

    1.Fill all those holes and gaps

    Search for all the holes and gaps in every nook and corner of your room as they will be your worst enemy if you move on to other things before you do this step. You can check this out if you want to know how it will affect your records.

    Put on some music on your studio or room and hear it somewhere form outside of the room in two different locations – on a place where there is a crack or some opening and the other on the normal wall to your room where there is no gap or openings.

    You might not even hear a thing in the Second case if you have a thick wall, while you will surely hear the music in the first case as the sound will travel right through the crack or gap as there is a medium of air in contact with the outside environment.

    So, seal up those gaps and cracks before doing anything. And for that, you can buy a Noiseproofing Sealant.

    2.Soundproof your Doors and windows

    doors
    Door

    This is the next big thing you need to consider after completing the first step.

    You can soundproof your door in different ways. One of the easiest and inexpensive ways to do it is by using an Adhesive Weatherstrip which you can put under your door. You don’t need anything fancy – just take it off, place it under the door and you have finished installing it. Simple as that.

    After that you need to examine the material of your door –if it is solid and thick in nature then there is no problem in it. But, if it’s not that solid and thick you probably have to change it to a more solid one. Having a more solid door will block more sound as compared to a lighter and thinner one.

    Now, if you don’t want to get a new solid door or change it you can get a Soundproofing Blanket. Yes, a Soundproofing blanket and hang it in front of the door. You might be wondering “Is it that effective?”, Yes it is effective. I think this is the way to go rather than getting a new door.

    Singer Safety Double Faced Quilted Fiberglass Panel, 4′ Width x 8′ Height x 2″ Thick

    • Panels have bound hems, double nickel plated brass grommets 12″ O.C. along top and 18″ O.C. along…
    • Double faced material in nominal 2″ thickness, for use as an absorber, or combination…
    • Measures 4′ width by 8′ height by 2″ thickness

    Last update on 2025-05-23 / Affiliate links / Images from Amazon Product Advertising API

    You can also us soundproof curtains but I think it won’t be that effective as compared to the above ones.

    windows
    Windows

    Let’s go to Soundproofing the Window part – if you have a window at your studio I suggest you get rid of it (if it’s alright with you). The reason is that getting rid of it will be the more easy and effective way to block the noise from outside.

    On the other hand you can use the Soundproofing blanket that I mentioned above to seal window tightly. And Don’t forget to seal all the edges carefully not to leave any small openings when you seal your window. I have read some other articles saying that you could use soundproof curtains too, but I in my opinion I think it won’t be that effective.

    If you don’t want to block the light coming from the window then you can use soundproof fibre glass instead of the normal glass for your window.

    Find out more about where to put bass traps in your home recording studio.Opens in a new tab.

    3.Soundproof your Ventilators –

    ventilators
    Ventilators

    After all the process, you need to look into this too if you have one of this. And more importantly you need one too so that you can let air in and out from your studio or room.

    Well, get a ventilator on your room if you don’t have one and you can use the Sound maze that is mentioned on the later part of the post (you can just go to the topic if you have only one ventilator).

    But if you have more than one ventilators you get rid of all the ventilators and leave only one. After that you can soundproof the only ventilator left. (You can just dry wall all the excess ones).

    Sound Maze technique – It is the process in which you let the sound pass through layers of zig-zag wooden plates covered with acoustic foam so that the sound coming from outside world is very much reduced when it reaches inside. But Still giving way for the air to pass in and out. Takes a little bit work but will work the best for an inexpensive route.

    A diagram representation is given below to describe it more better. When unwanted noise passes through the air vent set up in this manner, the noise gets deadened with the help of the acoustics foams present inside the vent. But Still making way for the air to flow in and out of the vent.

    The exciting thing is that you don’t need anything fancy to set this up. All the things you need are some wooden plates, acoustic foams, glues, and a saw to cut it.

    soundmazetechnique
    Sound Maze Technique

    4.Dampening your room –

    This for the ones who still have issues after all the above steps. The issues may be due to some structural problems with your studio or room.

    Something like your walls and the floor vibrates when the kids run around the house, as for your knowledge – sounds travel much faster in solids rather than in gas or solids. So, we have to solve this problem.

    We can arrive at a solution for this by the process of “Isolation”. It means to isolate your room so that the vibrating sounds gets dampened when it reach your Studio.You can isolate your room by adding another layer of wall at your room.

    I mean another separate layer and not building another layer of wall just adjacent to the initial wall. You will need to hire someone to do it and it will cost a bit too. (You can do it yourself if you have the knowledge).

    OR You can Build a second room inside your room to isolate that room from the outside world and achieve the best dampening as much as possible.

    As for the Floor you can build a floating surface with the help of wooden beams or PlatFoam and place a sheet above them to create a raised surface. (works in the same principle as above).

    Check my post on Sound deadening for walls which further go into details

    Conclusion

    These are the best and the most affordable way to soundproof your Home Studio that I could come up with. And there are also other ways to do it but would cost more – I will be covering other ways to do it in another article.

    Was this article helpful?
    YesNo

  • Home Studio Expert

    There are certain things we always leave out when we set up our home studio. And those things are the ones needed to improve your home studio.

    We didn’t think far and deep enough when we are just starting out with a couple of gears.

    Yes, we can manage without minding those small details. But when we go deeper and want more quality out of our Studio, we need to take care of the smallest details.

    Even the smallest details can make a big difference. And you will come to know of it when we go through these steps.

    Some of the steps that  I am going to mention here might have been known to you but you don’t pay much attention to.

    On the other hand, you might know nothing about them if you are just starting out. For this you don’t need to worry.

    There’s is nothing to worry about cause it won’t be that much of a headache to take in.

    How can they Improve your Home Studio?

    • These steps can help you improve your Recordings. It can also help you in your mixing process.
    • You will notice improvements in yours Tracks. It will help you in better positioning of the gears.
    • It will give you an idea on how to combat high and low frequencies, how reflections of sound works inside a studio.
    • What are the ideal type of Studio rooms, how you can improve your room even if it is not the exact ideal room.
    • Overall improvement in the quality of the record you produce and less headache.

    13 Steps You can take to improve your Home Studio

    The first steps are the basic steps you need to check before doing anything else. You should always try to do the things in order. It makes the process much easier.

    Step 1 : Check if you have prevented all the noise from entering

    You might be thinking.. What!! I have already done that.. But wait… Even if you have done it (Sound Proofing), your studio might not be completely free from it.

    As there are many factors that can affect this. High frequencies are easy to pick up with our naked ears but that’s not the case in low frequencies.

    There are certain low frequencies which have the right frequency to vibrate the walls of your studio. This type of frequency will pass through your walls and hinder you from creating a good quality record.

    So make sure you have the right amount of mass at your walls to prevent it. And also make sure your walls have no holes or cracks in it – even if it’s a small one.

    Don’t forget to do it with the doors and windows (if you have any) too.

    You can find out more about Sound Proofing from this article.

    Step 2 : Treating Your room correctly

    You should treat your room correctly if you have a pair of monitors on your studio.

    Even if you don’t have it you should still consider doing it. Doing it will help you in the long run. You will surely need a pair of monitors if you are going to upgrade your Studio.

    On the other hand, if you don’t do it while having a pair of monitors  then it’s like you don’t have monitors – you will get nothing good out of it.

    Because the sole purpose of a monitor is to bring about a real life scenario inside the studio.

    Therefore, you can hear the record by yourself and see how it will sound in real life situations.

    There are two main things included in the process of treating a room and they are –

    1. Treating the “Dead Region”
    2. Treating the “Live Region”

    These two are commonly known as Live End and Dead End (LEDE)

    Let us talk about these two in the next  two steps

    Step 3 : Treating the Dead region (Dead End)

    Lets’ say you have your gears set up against a wall of your room, then half of the room including that wall will be the Dead End region.

    Now, we need to place Sound Absorbers on some portions of the walls in this region. And you must remember not to overdo it.

    Overdoing it will lead to a completely dead environment and we really don’t want that to happen.

    So, what you need to do is cover about 25% – 35% of the walls with Sound Absorbers. You will also need to cover the back portion of the walls where the monitors are placed.

    This is because of the fact that it’s hard to reduce the reflections of sound waves from every direction or control them. As they are of wide range of frequencies.

    And for this we need dedicated absorbers like Broadband absorbers. After this let’s treat the Live End Region.

    Step 4 : Treating the Live Region (Live End)

    The other half of the room than the region mentioned above will become the Live End Region.

    And for the information, we need sound reflections and bare walls too inside our studio. We need them to mimic a real life scenario.

    On the other hand we need to evenly spread the reflections inside our studio. And for this we need to add diffusers at the walls inside this region.

    You can make diffusers yourself but it won’t perform that well as compared to a dedicated one.

    What we literally need is a zig-zag surface to spread the reflections on different directions. If you don’t have the bucks to get one, then you can use a book shelf as your diffuser.

    And fill those compartments with books leaving an empty one for every compartment you fill. So, that it creates a zig zag surface.

    But I recommend you to go with the dedicated diffuser – it works the best.

    Step 5 : Working only with a pair of headphones

    If you are going this way then the best thing you could do is to know what a good music sounds like at your headphones.

    Basically, you have to have some experience on your headphones to know this .. right!!. You gotta know how it will sound like at a real life situation.

    If you are a complete newbie on this then you can use some extra DIY ways to get a good quality track using only headphones.

    All you have to do is mimic real life situations at your home and find out how your track sounds like at different places and situation.

    To do this more properly, Read my post on Headphones vs Monitors which covers the topic plus some tips and tricks – It’s on the last portion of the article.

    Check out our Favourite Recommended Headphones if you are planning to get one.

    Step 6 : Positioning of the gears or Setups

    A lot of people ignore this when they are starting out but it is also one of the main things that matters.

    You should keep a distance from your walls when you set up or put your monitors. And the monitors should be oriented in a manner such that the way you sit – the way monitors are directed should be in an equilateral triangle.

    You can get an idea from the figure shown here.

    You should sit inside the region for better output. It’s the best you can get out from your setup.

    You can check out this article from Proaudiofiles for better understanding.

    Step 7 : Ideal room type

    There is an ideal room type for a studio and that is a room that has no parallel walls. I know it won’t be the case for many home studios.

    Almost all the home studios will have parallel walls and won’t be the ideal type at all.

    And we can combat some of this by doing the above steps. Parallel walls create standing waves after the sound waves reflected from the walls gets mixed up.

    Another thing to look out is how you place your gears at your room, it should be symmetrical in manner so that the sound waves are also reflected in symmetric inside the room.

    If it’s not in a symmetric manner, the reflections will be messed up and create annoying ones.

    You should also give some distance from the walls to give the desired decay time for reflections to occur.

    Step 8 : Use a Cross Feed Plugin (For using Headphones only when mixing)

    When you use only headphones when mixing it is very easy to misunderstand the quality of your record or mix.

    So you need something that will give you the experience of a real life speakers with stereo. And this is where you the Cross Feed Plugin comes into play.

    Search for the best one out there and use it. It won’t give you the full experience a pair of speakers will give you, but you can manage with it.

    “Something is better than Nothing”

    Step 9 : Use a Headphone amp

    If you want the best out of your Studio Headphones then you really need to get a headphone amp.

    Most high grade Studio headphones have High impedance and therefore you need a headphone amp so as to make them work to the fullest.

    You are good without it if you have modern one which don’t need an amp.

    But there are also cases where the in-built headphone amps inside audio devices are not upto the par. This is because the Built in amp are not that good.

    For this you need dedicated headphone amps. It is also easy for you  to get a headphone amp as there a lot of them for different price range.

    You can get a decent one at a very low budget. So definitely check them out.

    Step 10 : Use a DI Box

    You should DI (Direct Injection) Boxes when recording acoustic, electric guitars, keyboards,etc. Instead of using a simple mic to record them.

    This box is needed because the signals coming from this type of instruments are unbalanced and need to be balanced before fed into a mixing console.

    And also some of the Mixing console can’t take in instrument level signals so they need to be changed into mic level – this is where it is needed.

    Step 11 : Add sound Absorbers to your ceilings

    Yes, You need it very much and so you need to add the absorbers as I have mentioned above on your ceilings too.

    Ceilings are also just like the walls and they will reflect sound waves too, it won’t be that much as compared to the vertical ones.

    But you need to combat it too.

    Step 12 : Don’t forget the floors

    Add sound absorbers to your floors like acoustic foams and something like a Platfaom to raise above the ground.

    This will cover the bare floors absorbing the sound waves and limiting the transfer of waves from the floor if your studio is on the 2nd floor or something like that.

    If your floor vibrates when someone run around in the next room or when the garage door opens (suppose you are just above the garage) then, this will help you a lot.

    Step 13 : Add Bass traps

    You should add bass traps at the corners of your room so as to absorb lower frequency acoustic energies.

    Bass traps are usually placed at the corners of your room where the bass frequencies are the highest and where all the walls meet.

    Simple acoustic panels can’t absorb these type of frequencies and you should definitely install them inside your studio.

    Take action

    This is the last and the most important thing you need to do. Even if you read all these articles but fail to take action, then you won’t be able to improve your studio.

    Moreover, you will come to know how to improve your studio to get the best from it – if you take the above steps.

    It is because of the fact that all the studio are different from each other.

    Be sure to record and mix in a pleasant and cool environment. It will help you a lot in the process.


  • Affiliate Disclosure

    Homestudioexpert.com is a participant in the Amazon Services LLC Associates Program, an affiliate advertising program designed to provide a means for sites to earn advertising fees by advertising and linking to Amazon.com.

    This site also participates in other affiliate programs and is compensated for referring traffic and business to these companies

    flexoffers

  • A Complete Beyerdynamic DT 1990 Pro Review

    The Beyerdynamic DT 1990 PRO  is a great set of headphones coming all the way from Germany. In fact, Germany stands at the summit as Europe’s largest music market and third largest in the entire world.

    With exceptional build quality, the Beyerdynamic DT 1990 PRO offers immaculate resolution and genuine soundstage allowing the listener to perceive the depth and width of sound received from the drivers.

    The headphone is perfect for audiophiles looking for music of all genres, more so when they want tight bass and great highs.

    Beyerdynamic has been at the forefront of sound reproduction and audio recording since 1924. It has several firsts to its credit – the first dynamic headphones DT 48 in the year 1937 and the first studio-grade dynamic microphone M 19 in the year 1939.

    The 1990 PRO comes with Tesla drivers which use cutting edge system technology for their construction. The uniqueness of Tesla drivers is in the magnetic driver which is powerful and provides reproduction with high fidelity and minimal harmonic distortion.

    Sale

    beyerdynamic DT 1990 Pro Open Studio Headphones

    • Open studio reference class headphones for mixing and mastering, Made in Germany
    • 250 ohms, 45 mm dynamic Tesla neodymium drivers
    • Single sided, detachable cable with mini-XLR connectors

    Last update on 2025-05-23 / Affiliate links / Images from Amazon Product Advertising API

    Who is this product for?

    The Beyerdynamic DT 1990 PRO is ideal for studio and professional settings work when making crucial decisions on mastering and mixing. Its neutral stance allows the most balanced sound close to perfection.

    The capacity for detail is tremendous as even sound created by an uncharacteristic non-musical move by any musician gets captured.

    The 1990 PRO is ideal for professionals, whether freelancers or working for others, who need to wear headphones for long periods of time.

    These headphones make their time working more enjoyable and less strenuous. Broadcasters, music producers and sound technicians use the 1990 PRO extensively.

    Besides the professional uses, the 1990 PRO serves to enhance listening pleasure when music lovers want to enjoy their favorite music as it reproduces music with high definition.

    At the price range (Check it out here), it is worth every dollar for the professional. For the amateur who can afford it, there is nothing better than the 1990 PRO to enhance listening pleasure to reach the surreal and ethereal.

    What’s included?

    The 1990 PRO comes complete with Tesla neodymium driver, single-sided detachable cable with mini-XLR connector and replaceable ear pads and headband. The unit provides free accessories that include

    • Two pairs of velour ear pads – balanced (EDT 1990 B) and analytical (EDT 1990 A) sound characteristics
    • Two pairs of cables – 3 m straight and 5 m coiled
    • Premium hard case with appropriate cutouts and attached inside the pouch

    The headphones don’t use batteries. They just plug in and good to go. The unit needs no further accessories.

    Overview of features

    The Tesla driver technology is highly efficient when it comes to precision and power so much required when reproducing sound. The resolution is highly accurate and power output very high.

    The highs are sparkling, the midrange detailed and bass precise. These combine brilliantly to produce a sound of the highest quality.

    The open-back design allows for achieving the natural and spatial sound. This ability makes the 1990 PRO ideal as a reference for mastering and mixing applications. The same feature comes in handy when listening to music critically.

    Complementing the open-back design, the Tesla driver possesses high-resolution capability which imparts natural stereo that is both dynamic and wide. The titanium coating fabric helps to balance sound quality.

    The 1990 PRO operates with the nominal frequency between 5 and 40,000 Hz.

    The quality of the reproduction is dependent on the ear pad used. In the analytical ear pad, the audio is closed while it is deeper in the balanced pad. The stereo separation is strong in both the pads. The resolution is awesome with each instrument resolved clearly and well separated.

    The 1990 PRO carries the Beyerdynamic trademark of higher treble energy. Its lower treble and upper midrange analytical character carry on even at higher frequencies.

    The bass quality is exceptional being punchy and evenly distributed without bleeding into the midrange.

    If at all there is any weakness it is in the midrange. While male voices are realistic, female voices show more detail due to vocal recognition.

    Since isolation is difficult in open headphones, the 1990 PRO is avoidable as a portable device, especially on train or bus rides. The headphone is not leak proof in respect of others nearby hearing sounds when someone is using the headphone.

    While using the headphone without an amp is possible allowing for pleasing sound, the 1990 PRO would benefit more from an amp as control would become easy to highlight all the strengths.

    Handcrafted in Germany, the 1990 PRO displays the highest level of craftsmanship using the best quality of durable materials such as aluminum for end pieces, high-tech textiles for ear pads, gold-plated connectors for stereo jack and lighter materials to enhance comfort.

    The 3 m straight cable and the 5 m coiled cable can connect easily with a 3-pin mini XLR single-sided connector.

    The 1990 PRO comes with a perfectly curved, padded and adjustable headband. Its earpads enable functionality and comfort through the soft foam for the insides.

    They support long working sessions on account of their construction with sufficient depth and width for matchless sound reproduction. They avoid stuffiness due to vents provided.

    Pros

    1. These DT1990s have this fantastic ability to pull apart each track into the individual instruments, especially in rock music. It won’t be let down even if one pays more for the performance they are getting.

    2. These are excellent headphones. It gives a great and clear picture of the sound. There are no questions here, the build is fantastic

    Cons

    1. Ear pads are hard to swap

    2. Pretty much requires an amp

    3. Large and bulky, not for portable use

    4. There seems to some problem in aligning the left and right ear cups and a simple solution is needed to resolve this.

    How to get the most out of it

    To get the best out of the 1990 PRO follow faithfully the instructions provided which include safety instructions as well

    • Connect the cable with the lockable 3-pin mini XLR cable connector
    • Ensure cable connector locks perfectly.
    • To unlock, press the small release button and pull the cable out gently
    • Keep ear pads and headband clean and tidy
    • Use a damp cloth to clean
    • Ensure dryness of pads after cleaning before reuse on the headphone
    • Work with low volume to avoid damage to ears especially when working long hours. Use high volume for short periods only
    • Recommended usage – from 85 dB SPL for 8-hour working stretch to 100 dB SPL for 15-minute working stretch
    • Connect headphone only when the volume is at minimum
    • Adjust only after putting on the headphone
    • Avoid jerky movements to prevent damage to ears and spectacles. Handle cable carefully to avoid accidental strangulation
    • Use hard case to store headphone when not in use or while traveling

    It is rewarding to follow the instructions given in the manual to enjoy a beautiful experience with the headphone. It also helps to get the best performance from the

    Alternative Headphones

    While the 1990 PRO is of recent origin, it has no peers especially for professionals as it offers some remarkable features. However, the Sennheiser Audiophile Headphone HD 660 S is an excellent alternative giving its own special features at a lesser price.

    For home listening, the Sennheiser HD 650 Over-Ear Headphone and the Beyerdynamic Amiron are somewhat comparable though there is a vast difference in price.

    Sale

    Sennheiser Consumer Audio HD 650 – Audiophile Hi-Res Open Back Dynamic Headphone, Titan

    • Specially designed acoustic silk ensures precision damping over the entire frequency range and helps…
    • Improved frequency response is 10 39,500 Hertz ( 10 dB)
    • Hand selected matched driver elements; Highly optimized magnet systems for minimum harmonic and…

    Last update on 2025-05-23 / Affiliate links / Images from Amazon Product Advertising API

    beyerdynamic Amiron Wireless High-End Stereo Headphone

    • High-end Bluetooth headphones with innovative sound personalization. Operating range up to 10 meter
    • High-end Bluetooth headphones with optimum sound quality thanks to Tesla technology and top-class…
    • Adapts acoustically to the user’s hearing thanks to integrated sound personalization and thus…

    Last update on 2025-05-23 / Affiliate links / Images from Amazon Product Advertising API

    For casual listeners intending to enjoy their favorite music, the lower priced models would serve the purpose well.

    Conclusion

    The Beyerdynamic DT 1990 PRO headphones are the best on the market for professionals working on audio projects requiring a professional touch.

    Since the professionals spend long hours mixing and mastering sounds, they need a set of headphones that are comfortable to work with besides providing the necessary specifications for their professional work. The headphones are also excellent for listening to music while relaxing.

    Was this article helpful?
    YesNo